More TBS User Tips and Tricks
Sequential Numbering of Drawings in an Element
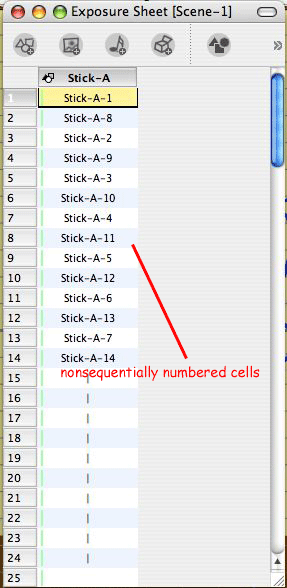
When I am doing an animation sequence, I like to have all my drawings sequentially numbered. There are many reasons that this is a useful practice. Besides being visually easier there is also the fact that if you use the cell swapping feature of the Properties panel you know that it presents your cells in sequential numerical order. Also if you use the advanced cycle building function you need to have your cycle organized in sequential cell order for it to work properly. Now one of the problems that I have with TBS is that if I am drawing the animation directly into TBS and I don’t know exactly how many drawings or inbetween drawings I will need, then just letting TBS automatically number the drawings as I make them will cause my cells to be numbered in the actual order of creation which is non-linear as opposed to sequentially numbering them.

When I animate I typically work from a series of key pose drawings and then, as I refine the timing, I go back and fill in the appropriate breakdown drawings and in between drawings. This is an iterative process and highly non-sequential. So as an example my exposure sheet column for an element “A” might end up looking something like:
A-1, A-10, A-6, A-11, A-2, A-12, A-7, A-13, A-3, A-14, A-8, A-15, A-4, A-9, A-16, A-5.
Ideally I would prefer it to look like:
A-1, A-2, A-3, A-4, A-5, A-6, A-7, A-8, A-9, A-10, A-11, A-12, A-13, A-14, A-15, and A-16.
Now technically the numbering isn’t critical because the location of the cells in the exposure sheet controls their position in the viewing of the frame sequence, but organizationally, for me as the animator, I find it easier to work with my drawings in the exposure sheet when they are numbered sequentially like I would number them if I were doing this as hand drawn animation on paper.
So here is a tip from my personal work flow style which resolves this issue, at least to suit my personal way of working.
When I create a new drawing element, for example element “A”, I make an educated guess as to the maximum number of cells I will need for this element for this scene. So again, for this example, I decide I might need as many as 100 drawings.
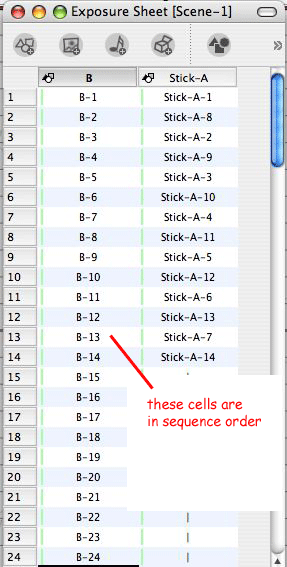
My first step is to go to the first cell position of the element A's column and “right click” and select Insert Cell.. from the context menu. In the number box, I enter 100 making sure that Named CellsBefore is selected and click on OK. This causes the element to be populated with 100 cells sequentially numbered from 1 to 100. An alternate way to do the same thing would be to highlight a range of cells ( I.E. frames 1 to 100) and “right click” and select Insert Cell.. from the context menu which will then populate all the highlights frames with sequentially numbered blank cells.

Next, I select the first cell in the range and holding the shift key down, I select the rest of the 100 cell range of cells and right click and select Delete Cell from the context menu. You might be wondering why I just deleted the cells I just created but they aren’t really deleted they just no longer show in the exposure sheet.
Now as I animate, I can select the desired numbered cell I want for a drawing by using the Cell tab in the Properties panel. This gives me complete control of my sequential numbering and even if I choose to work on 2’s for example (that's two exposures for each cell) I can just use the odd numbered drawings and save the even numbers for 1’s when I need to have them. For example:
A-1, A-3, A-5, A-7, A-9, A-11, A-13, A-15, A-17, A-19 …
I like having the visual confirmation of cell numbers matching frame numbers. And if you don't want to go through the delete and add back steps, you can just leave the blank sequentially numbered cells in place and use them or replace them with extra exposures of a previous cell as desired.
Any unused numbers aren’t a problem as they aren’t included in the published animation. For traditionally trained animators like me, this is a nice way to keep things familiar and well organized.
Using Elements Notes and Cell NotesThere is never enough desktop space in TBS when you are working, even if you are lucky enough to have a duel display setup. So there is always a need to use some useful work flow tricks to save space and still have good work organization. One such trick is in naming elements and then utilizing element notes and cell notes for more detailed information.
When I use to do mostly hand drawn animation on paper, I always found ways to abbreviate things and also to write little notes in the margins of my drawings or exposure sheets. So for me, some of those methods just naturally carried over into my TBS work flow. I normally name my elements by single letters of the alphabet. (A, B, C, D,E,F,G …..) and my backgrounds BG with a number, like BG1,BG2. If I later need to add an additional element in between two existing elements, I just add a number to the element name, like A1. This use of alphabet letters just helps me to be more organized and it also makes finding things in a large time line label list really easy.
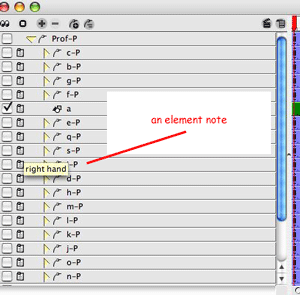
Of course, the major drawback to using a single letter for a name is that it doesn’t tell me what the element contains. So to solve that, I add an element note to each element when I create it. I can put as much detail about the element in that note as I need. The note doesn’t clutter up my screen space, but it is there for me to refer to just by “rolling” over the element’s name label in the timeline or the exposure sheet. So if element “B” is “crazy rabbit character”, I will put that in my element note for element “B”.

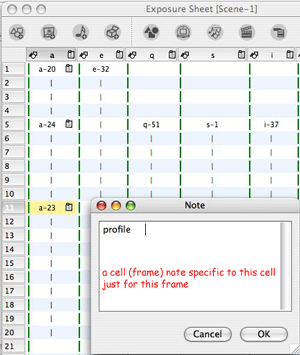
Now cell notes are also very useful when working. I use them whenever I want to remind myself of some action or detail that I want to add to a drawing at a later time. I tend to animate in an iterative multi-pass approach, which means I may revisit a drawing many times before it is completed. So I use an attached cell note to keep up with things left to be done or to be considered. For example “add additional action with crazy rabbit’s ears starting at this drawing”.

The beauty of cell notes is that they are frame specific, which means that when I tie a note to cell a-23 at frame 11 that note is only seen at that location. If I reuse cell a-23 at a different frame location it doesn't include the previously attached note. Element notes are always attached to the element and show both in the Timeline panel track list and in the Exposure Sheet panel.
Labels: Cell Notes, Cell Numbering, Element Notes, Tips


2 Comments:
I've read this a couple of times in the past, and I remember you posting something about it in the TBS forum, but it really struck me last night and today how useful this is.
If I create a standard x-sheet on paper, for example, and I want my TBS element to have the same numbering, I can use this system to work from extremes to breakdowns to in-betweens without fouling up my numbering system. Nice to come back and re-read this stuff on occassion. Thanks!
Great tip for having time-related drawing numbers increments. New inserted drawings can be named with added letters (like B-23b between B-23 and B-24). Thanks!
Matching drawing numbers to frame numbers is another story: as soon as you Insert Cell or Add Exposure, the neat correspondence is lost...
Post a Comment
<< Home