Jumping Into Animation - Part 1
In our last tutorial we animated a stick figure throwing a ball. It introduced us to using TBS for making a simple animation and we learned to use "onion skinning" and to make "in between" drawings. If you missed it then please check out "A Good Place To Start - Part 1".
We are going to do a slightly more involved animation this time. We will be doing a "jumping" action. It basically has three sections. We start out with an "antic" (an anticipation) followed by the jump itself and we "settle" out at the end. For simplicity sake I won't be doing any in between drawings so this will be a "rough" exercise but instructive none the less.
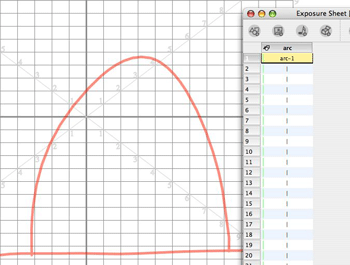
We will start a new animation project in TBS and create our first drawing element on the scene one exposure sheet. I am renaming this element "arc" because it will be used as a visual aid in my work. One important tip when animating is that you can and will create many elements (layers) which you will use for "scratch" or "rough" work and then hide them later.
So on cell 1 of frame 1 of "arc" I drew a ground line and an arc in red. (the color choice is not important, in fact I chose a red that is partially transparent) Remember this element is to be used as a guide in roughing out the jump and then it will be hidden and not needed. My jump will span about 25 frames at 24 frames per second, so I extend the exposure of cell 1 of element "arc" out to frame 25. That way the arc is visible while I'm roughing in the action.
Now I will create a second element in my exposure sheet and rename it "a". I typically name my elements single letters and use element notes to add more descriptive information about the element. It saves space which is always a good thing. I am drawing with the pencil tool and a pen set to a Max of 5 pixels. I have switched to green as my drawing color. Be sure to turn on your Auto-Light table (shortcut L) so that the arc is visible from below. And there is our old friend the stick figure in pose one.
You may notice that element "a" already has a spread out sequence of cells showing. That's because I have a habit of pre-populating a new element with cells before I draw. Certainly not a requirement, but rather a habit. What I do is start at frame 1 and insert a large enough number of cells to handle what I'm planning to draw. Typically I start with 100 cells. This gives me a sequentially numbered set of cells for that element. I like to match cell numbers to frame numbers. The unused numbers are just stored in the scene folder and are always available to use if I want to add in between drawings. I don't like random cell numbers. Animation is a detail oriented and organized art. You will also notice that I have spaced the cells based on my desired timing of poses for the jump. How did I determine that spacing? Click here to learn more about animation timing .
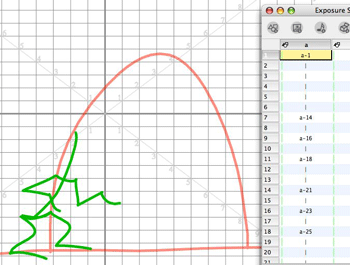
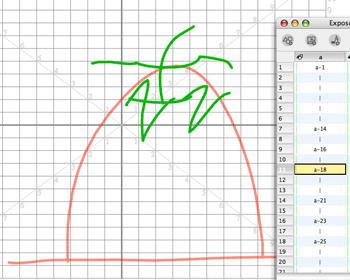
Pose 2 is our "antic" pose for the jump. The main purpose of an "antic" is to create an anticipation of a coming action. It helps to alert the viewer that something is about to happen. Also if you try jumping, you will notice that you squat down or flex downward before you push upward.
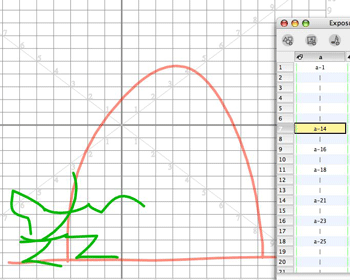
OK, so now in pose 3 our jumper is beginning to unleash some of that energy stored up when he flexed his knees. Notice that we will use the red arc as a visual guide to follow. Remember in our throwing tutorial we talked about the importance of arcs in non-mechanical motions.
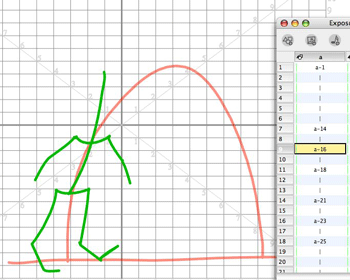
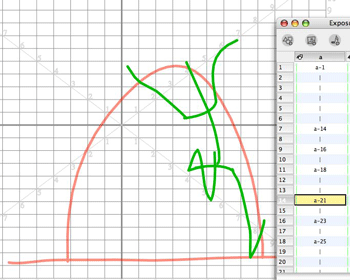
Pose 4 is the top of the jumper's arc. For all you fans of the bouncing ball exercises, you might recognize the squash and stretch aspects and similarity in a character jumping.
Pose 5 has him starting to come back to the ground.
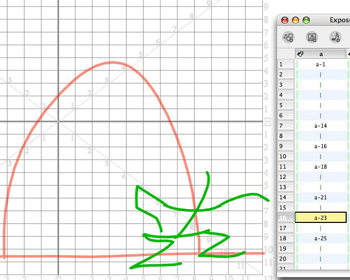
Pose 6 is the squash of his weight impacting the ground.
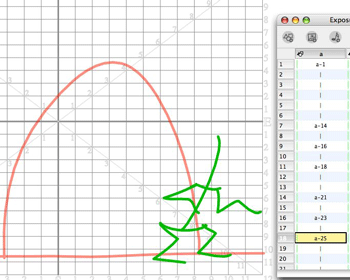
And pose 7 is the "settle" part of the jump as the character relaxes after landing.
So now we have a rough jumping action. View it here.
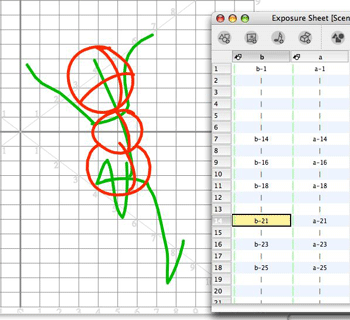
Next we will add another element to our Exposure sheet and rename it "b". This element will be for some construction volumes to help us better draw the character solidly. These volumes are like circles or ovals but you want to add contours to them and visualize them as 3D solids.
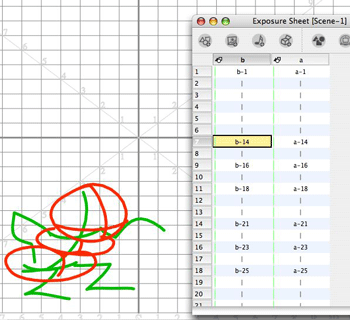
I'm not showing every frame here, just the most significant ones.
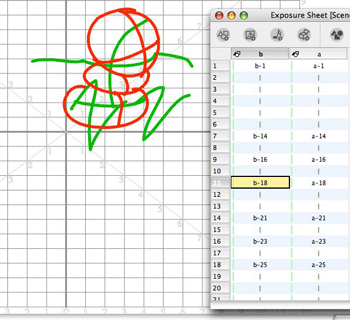
I am drawing in orange just to make things really visible. Both elements "a" and "b" are strictly for construction purposes and in Part 2 we will be drawing the actual character on layer "c" using them as visual guides.
View the jump with the volumes added here.
We will continue in Part 2.
We are going to do a slightly more involved animation this time. We will be doing a "jumping" action. It basically has three sections. We start out with an "antic" (an anticipation) followed by the jump itself and we "settle" out at the end. For simplicity sake I won't be doing any in between drawings so this will be a "rough" exercise but instructive none the less.
We will start a new animation project in TBS and create our first drawing element on the scene one exposure sheet. I am renaming this element "arc" because it will be used as a visual aid in my work. One important tip when animating is that you can and will create many elements (layers) which you will use for "scratch" or "rough" work and then hide them later.
So on cell 1 of frame 1 of "arc" I drew a ground line and an arc in red. (the color choice is not important, in fact I chose a red that is partially transparent) Remember this element is to be used as a guide in roughing out the jump and then it will be hidden and not needed. My jump will span about 25 frames at 24 frames per second, so I extend the exposure of cell 1 of element "arc" out to frame 25. That way the arc is visible while I'm roughing in the action.
Now I will create a second element in my exposure sheet and rename it "a". I typically name my elements single letters and use element notes to add more descriptive information about the element. It saves space which is always a good thing. I am drawing with the pencil tool and a pen set to a Max of 5 pixels. I have switched to green as my drawing color. Be sure to turn on your Auto-Light table (shortcut L) so that the arc is visible from below. And there is our old friend the stick figure in pose one.
You may notice that element "a" already has a spread out sequence of cells showing. That's because I have a habit of pre-populating a new element with cells before I draw. Certainly not a requirement, but rather a habit. What I do is start at frame 1 and insert a large enough number of cells to handle what I'm planning to draw. Typically I start with 100 cells. This gives me a sequentially numbered set of cells for that element. I like to match cell numbers to frame numbers. The unused numbers are just stored in the scene folder and are always available to use if I want to add in between drawings. I don't like random cell numbers. Animation is a detail oriented and organized art. You will also notice that I have spaced the cells based on my desired timing of poses for the jump. How did I determine that spacing? Click here to learn more about animation timing .
Pose 2 is our "antic" pose for the jump. The main purpose of an "antic" is to create an anticipation of a coming action. It helps to alert the viewer that something is about to happen. Also if you try jumping, you will notice that you squat down or flex downward before you push upward.
OK, so now in pose 3 our jumper is beginning to unleash some of that energy stored up when he flexed his knees. Notice that we will use the red arc as a visual guide to follow. Remember in our throwing tutorial we talked about the importance of arcs in non-mechanical motions.
Pose 4 is the top of the jumper's arc. For all you fans of the bouncing ball exercises, you might recognize the squash and stretch aspects and similarity in a character jumping.
Pose 5 has him starting to come back to the ground.
Pose 6 is the squash of his weight impacting the ground.
And pose 7 is the "settle" part of the jump as the character relaxes after landing.
So now we have a rough jumping action. View it here.
Next we will add another element to our Exposure sheet and rename it "b". This element will be for some construction volumes to help us better draw the character solidly. These volumes are like circles or ovals but you want to add contours to them and visualize them as 3D solids.
I'm not showing every frame here, just the most significant ones.
I am drawing in orange just to make things really visible. Both elements "a" and "b" are strictly for construction purposes and in Part 2 we will be drawing the actual character on layer "c" using them as visual guides.
View the jump with the volumes added here.
We will continue in Part 2.
Labels: Tutorial


0 Comments:
Post a Comment
<< Home