Using A Subtractive Animation Technique
Recently on the Toon Boom Studio Forums a question was asked about doing tele-strator style animation. The idea being the desire to have the words or drawing to magically appear to be drawn out as you watch the movie. It is a really effective type of animation and surprisingly easy to produce. The secret is a technique called subtractive animation.
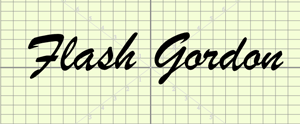
To begin our subtractive animation tutorial, I have created a cell in a drawing element using the text tool and a nice cursive style of script font. The is just for demonstration purposes and isn't significant to this technique which can be done with any drawing you create.
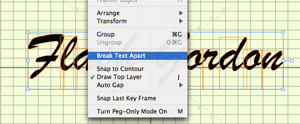
Because I used the text tool, I want to break this text object apart two times. The first time separates the text into individual letters but still as text objects. The second time converts the text objects into drawn shapes which can be easily edited.
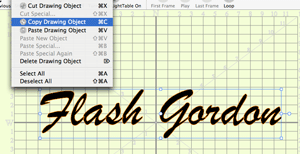
Now that I have the writing converted, I'll select everything and copy the selected drawing object.
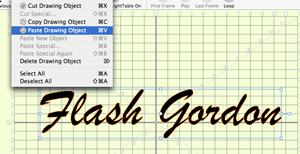
Then I'll paste the copied drawing object right on top of the original drawing object with just a slight offset. And while I have this pasted drawing object still selected, I'll change its color to red which gives a nice shadowed letters effect to the writing.
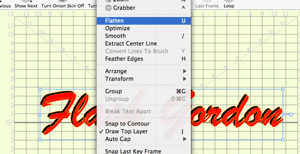
Now I'll select everything again and flatten the two drawing objects so that they become a single layer. The reason I did this is that they will be easier to edit as I begin my subtractive technique. I have now completed cell number 1 of this animation.

From now on, I don't need to do any more drawing because this entire technique is about subtracting or removing parts of the original drawing. So my next step is to extend the exposure of my first cell by one additional frame. The easiest way to do this is while I have my drawing element track selected in the timeline and my red frame slider on my first cell's frame, I just use keyboard shortcut "R" to repeat the exposure.
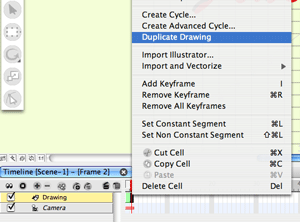
With my first cell's exposure repeated, I move the frame slider to the second frame and use the Duplicate Drawing command. What that does is to take the second exposure of my first cell and create a new cell which is an exact duplicate in its place. This cell is cell number 2 and is unique and independent from cell number 1 even though they look identical.
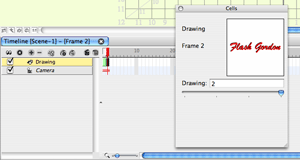
Now that I have created a duplicate of cell number 1, I can begin to modify cell number 2 by using the scissors tool and/or the eraser tool to remove a small part of the drawing. I have to decide how I want this animation to progress so that, in this case, it will look like the words are being written on the screen. Because writing is normally done from left to right, I want to start at the end of the writing cycle by starting on the far right .
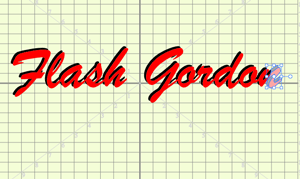
I use the scissors tool to select a part of the writing. And then I delete that selection. I actually used the lasso feature of the scissors tool so that I could sculpt out the part I wanted to remove. Sometimes you may need to also come back and use the eraser tool to cleanup the drawing.
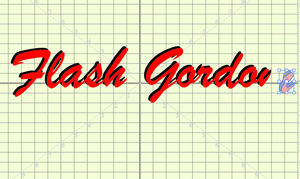
Having subtractive modified cell number two, I want to repeat my steps to create and modify the next cell. So first I extend the exposure of cell number 2 for an additional frame. Move to that extended frame and use the Duplicate Drawing command to create cell number 3 which is an exact but independent duplicate of cell number 2.
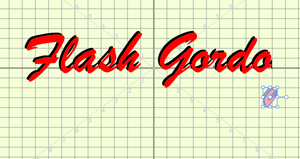
Now that I have created cell number 3, I'll use the scissors tool and the eraser tool to subtract some more from my writing drawing. Still working from the far right end. I select a small piece and delete it.
I'm going to keep repeating this process of extending the exposure of the current cell by one frame. Then duplicating the drawing. And then subtracting a small part of the newly created cell from the far right end. The number of subtractive steps is totally a personal decision based on how you fast you want this effect to happen. I chose 23 subtractive steps for this example. So at 24 FPS that means the effect is about one second long at this point.

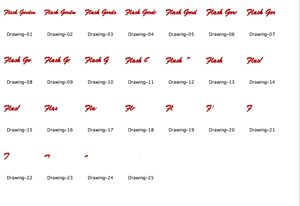
Below is a thumbnail view from the library of the sequence of cells I created using this subtractive animation technique. You should notice that cell 1 is the original drawing and it gets slightly reduced as I subtract pieces of the drawing in each of the successive cells in the sequence until it is replaced by a completely empty cell.
Click on the thumbnail sequence above to see and larger version.
So now we have our sequence of drawing cells each progressively reduced from the original but the order is not what we need to create the final animation effect. We need to go from nothing to the final writing which means we need to reverse the order of the cells. You could do this dragging cells about in the exposure sheet or with the cell swapping panel but that would be very tedious and not nearly as efficient as the trick I'm going to show you for reversing the order of a sequence of cells.

We will begin by selecting the entire sequence of cells for our subtractive animation. This could be done either in the timeline panel or the exposure sheet panel. I'm doing it in the timeline panel.
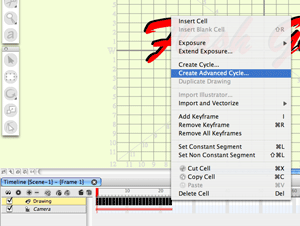
I right click to open the context menu and select the Create Advanced Cycle command.
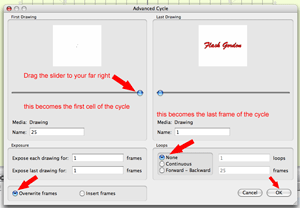
Click on the dialog image above to see a larger image.
The advanced cycle dialog box opens and I move the cell selection slider for the first drawing of this cycle to the far right which, in this case, selects drawing 25, a blank cell, for my first cell in this sequence. I don't need to change the last cell as it defaulted to cell 1. I want the button for Overwrite Frames to be selected and the button under loops for None to be selected. Then I click on the OK button to reverse my sequence of cells. If I now scrub my sequence in the timeline I will see that cell 25 is now my first frame and cell 1 is now my last frame of my sequence and the effect of writing from nothing to something is working.
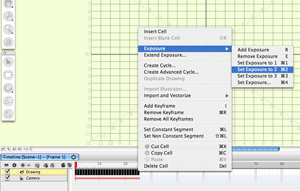
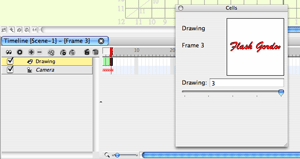
Now that I have reversed my cell order for this sequence of cells, I can play around with the exposure of the cells to enhance the visual look of my writing animation. I'll select all the frames in the sequence and right click to open the context menu and use the set exposure to... command. I finally decide to use set exposure to 3 which means each cell in the sequence will have three exposures. This is a personal preference decision depending on what you want from this animation effect.

Click on the image above to watch the subtractive animation technique used to simulate writing on the screen.

Click on the image above to see this technique in an actual application.
It looks really difficult to create but using subtractive animation makes producing animated drawing or writing really easy. I hope that you learned a new trick or two.

To begin our subtractive animation tutorial, I have created a cell in a drawing element using the text tool and a nice cursive style of script font. The is just for demonstration purposes and isn't significant to this technique which can be done with any drawing you create.

Because I used the text tool, I want to break this text object apart two times. The first time separates the text into individual letters but still as text objects. The second time converts the text objects into drawn shapes which can be easily edited.

Now that I have the writing converted, I'll select everything and copy the selected drawing object.

Then I'll paste the copied drawing object right on top of the original drawing object with just a slight offset. And while I have this pasted drawing object still selected, I'll change its color to red which gives a nice shadowed letters effect to the writing.

Now I'll select everything again and flatten the two drawing objects so that they become a single layer. The reason I did this is that they will be easier to edit as I begin my subtractive technique. I have now completed cell number 1 of this animation.

From now on, I don't need to do any more drawing because this entire technique is about subtracting or removing parts of the original drawing. So my next step is to extend the exposure of my first cell by one additional frame. The easiest way to do this is while I have my drawing element track selected in the timeline and my red frame slider on my first cell's frame, I just use keyboard shortcut "R" to repeat the exposure.

With my first cell's exposure repeated, I move the frame slider to the second frame and use the Duplicate Drawing command. What that does is to take the second exposure of my first cell and create a new cell which is an exact duplicate in its place. This cell is cell number 2 and is unique and independent from cell number 1 even though they look identical.

Now that I have created a duplicate of cell number 1, I can begin to modify cell number 2 by using the scissors tool and/or the eraser tool to remove a small part of the drawing. I have to decide how I want this animation to progress so that, in this case, it will look like the words are being written on the screen. Because writing is normally done from left to right, I want to start at the end of the writing cycle by starting on the far right .

I use the scissors tool to select a part of the writing. And then I delete that selection. I actually used the lasso feature of the scissors tool so that I could sculpt out the part I wanted to remove. Sometimes you may need to also come back and use the eraser tool to cleanup the drawing.

Having subtractive modified cell number two, I want to repeat my steps to create and modify the next cell. So first I extend the exposure of cell number 2 for an additional frame. Move to that extended frame and use the Duplicate Drawing command to create cell number 3 which is an exact but independent duplicate of cell number 2.

Now that I have created cell number 3, I'll use the scissors tool and the eraser tool to subtract some more from my writing drawing. Still working from the far right end. I select a small piece and delete it.

I'm going to keep repeating this process of extending the exposure of the current cell by one frame. Then duplicating the drawing. And then subtracting a small part of the newly created cell from the far right end. The number of subtractive steps is totally a personal decision based on how you fast you want this effect to happen. I chose 23 subtractive steps for this example. So at 24 FPS that means the effect is about one second long at this point.

Below is a thumbnail view from the library of the sequence of cells I created using this subtractive animation technique. You should notice that cell 1 is the original drawing and it gets slightly reduced as I subtract pieces of the drawing in each of the successive cells in the sequence until it is replaced by a completely empty cell.

Click on the thumbnail sequence above to see and larger version.
So now we have our sequence of drawing cells each progressively reduced from the original but the order is not what we need to create the final animation effect. We need to go from nothing to the final writing which means we need to reverse the order of the cells. You could do this dragging cells about in the exposure sheet or with the cell swapping panel but that would be very tedious and not nearly as efficient as the trick I'm going to show you for reversing the order of a sequence of cells.

We will begin by selecting the entire sequence of cells for our subtractive animation. This could be done either in the timeline panel or the exposure sheet panel. I'm doing it in the timeline panel.

I right click to open the context menu and select the Create Advanced Cycle command.

Click on the dialog image above to see a larger image.
The advanced cycle dialog box opens and I move the cell selection slider for the first drawing of this cycle to the far right which, in this case, selects drawing 25, a blank cell, for my first cell in this sequence. I don't need to change the last cell as it defaulted to cell 1. I want the button for Overwrite Frames to be selected and the button under loops for None to be selected. Then I click on the OK button to reverse my sequence of cells. If I now scrub my sequence in the timeline I will see that cell 25 is now my first frame and cell 1 is now my last frame of my sequence and the effect of writing from nothing to something is working.

Now that I have reversed my cell order for this sequence of cells, I can play around with the exposure of the cells to enhance the visual look of my writing animation. I'll select all the frames in the sequence and right click to open the context menu and use the set exposure to... command. I finally decide to use set exposure to 3 which means each cell in the sequence will have three exposures. This is a personal preference decision depending on what you want from this animation effect.

Click on the image above to watch the subtractive animation technique used to simulate writing on the screen.

Click on the image above to see this technique in an actual application.
It looks really difficult to create but using subtractive animation makes producing animated drawing or writing really easy. I hope that you learned a new trick or two.
Labels: Tutorial


11 Comments:
Hi, JK
I'm making a particular animated title for my new animation project and I was having trouble getting Toon Boom's type to work for me. I am trying your tip on how to vectorize my type with the Break Text Apart tip you suggested. You say it should be done TWICE, but I selected the type and did it the first time, but I can't do it a second time. That is, the Break Text Apart selection is grayed out and not available. I'm obviously missing something. Please help!
Part of the reason I'm doing this is that I've been doing my final editing in iMovie HD and the titles I made in Photoshop, which have nice and sharp typography, look terribly jagged when place in iMovie. I've read online that it's a common problem in iMovie HD (I hate the new iMovie--terribly non-intuitive and limited sound editing), but the art made in Toon Boom looks great. So I'm thinking that if I made my titles in TBS, all in Vector, they'll look as great as my artwork does.
Thanks in advance for your help.
-E
E,
Be sure you are doing the selection using the Drawing Select tool (1) and not the text tool. Unless there is something strange going on with TBS on the Mac, the ability to Break Text Apart to produce a vector shape works the same in all versions of TBS including V5.0. I don't have V5.0 on the Mac but tested it on the PC. The first break gives you individual letters and the second break gives you vector shapes. Let me know if you are still having issues. And as always thanks for your kind support.
Thanks so much, Jerry. I'm sure I was using the Drawing Select Tool both times & it only worked the first time, but I'll give it another go after I finish a sketch for an actual job. I'll let you know either way.
By the way, I am using Leopard on an Intel Mac.
Very Best,
-E
Hi, JK-
No luck. Like before, I can't Break Text Apart a second time. When I first typed in the text, I could got to the Tools drop-down and the words "Break Text Apart" were clickable, but now they aren't.
Wait, Stop the Presses! For some reason--perhaps because I've been moving the text around to fit my needs, the Break Text Apart is now clickable. I know, because I just went to my TBS project to look for the exact words there for the action and, suddenly, it was (is) available to click. I'll forge ahead and let you know if all layers are workable.
Thanks again for all these helpful tutorials!
-E
Dang, false alarm. I added more text today and I guess I forgot to do the Break Text Apart thing to all of the text cells. I wasn't doing them a SECOND time as I thought, I guess I was just doing them for the first time, since none of the others I tried are clickable. I'm not sure what to do, since if this is a problem related to Mac Leopard, or if it's something within my computer setup that's causing the problem, I have no idea how we can trouble shoot it.
I wonder if I can open the problem set of frames (I have it as a separate "Scene") in Flash and vectorize the text there. I'm not very familiar with Flash & haven't used in in ages, but that might be a fairly simple fix if you think it would work.
-E
E.
In Flash you select the text and from the Modify menu choose Break Apart twice very much how it works in Toon Boom. Use the select tool to select the text and it is a two step process the first step gets you individual text object letters and the second step converts them to vector shapes.
If I'm bring in the TBS file into Flash that I've already done the first step of vectorization (first Break Text Apart), will I have to start from scratch or will Flash see that I only have one more Break Text Apart to complete?
-E
Just a note so I can click the Follow-up comment email thing. Forgot to click it.
Thanks again, JK
E,
I believe that Flash will recognize the individual letter text objects from TBS so you may only need to break them apart one more time. Once in the form of vector shapes they will no longer be text but shapes that look like text and you can treat them just like any other drawn shape.
Thank you, JK, will give it a go.
I'm off now for dinner and a brew with an old friend. It's been a frustrating day with changes on two jobs and this Toon Boom glitch, so I'm looking forward to getting out & away from this computer and my drawing table. Then with a fresh start tomorrow, your help & expertise and some effort on my part should finally solve this problem.
-E
This was really useful and informative. I had a go at it, and it works really nicely. I'm really glad to have stumbled over your blog :)
Post a Comment
<< Home