Thumbnail Planning Technique
In this tutorial I'm going to show you some basic animation planning using thumbnail drawings to work out an action. This particular action is a cartoon style run which is an exaggerated interpretation of a normal run.
Examples of animation are often presented as highly finished pieces and there is a misconception that the animator started with the final version that is shown. I more often than not have to work through several stages before I get to a satisfactory final animation. One of those stages is a planning and visualizing stage where I like to do thumbnail drawings to work out the major aspects of the action. So in this tutorial I want to demonstrate this part of the creative process as it has evolved thanks to having software like Toon Boom Studio to facilitate the work. Thumbnailing for planning and visualizing is a traditional approach in animating but it has evolved beyond just doing a page or two of gestural drawings due to the ease in which we can quickly produce test movies using software. These visualization stages are actually lots of fun, so lets get started.
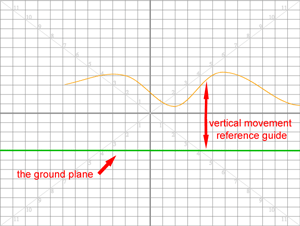
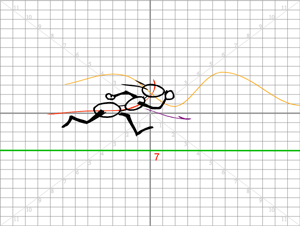
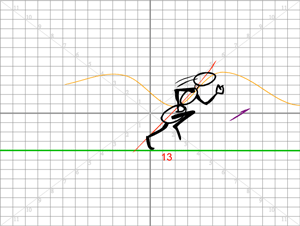
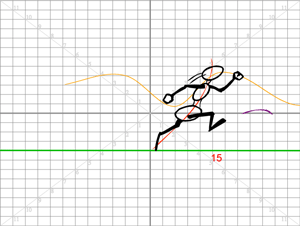
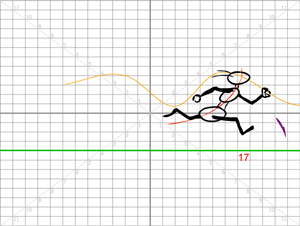
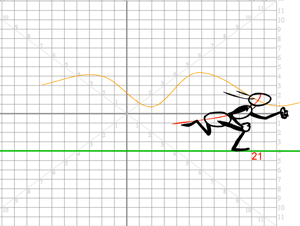
Now here is a trick that I'm often surprised is omitted in many explanations about animating an action. I suppose it is thought to be obvious, but maybe it isn't. If you are going to animate a character walking or running etc, you need to establish a reference to the ground. In this example it is as simple as a straight line, but it is critical, otherwise you don't have a way to relate the character's movement to the surface on which they are moving. This sequence is mostly a side view for simplicity sake, but references become even more important as the perspective of the scene increases in complexity.
Once I have established my ground plane, I usually will add some rough motion guidelines. In this example I added a vertical motion line because a cartoon run is not just forward motion, but it also has a significant up and down component. Here is an important tip: notice my vertical guide is not symmetrical. It is intentionally asymmetrical. Why? Because symmetrical is mechanical and not organic and it is also boring. Cartoons are fun and they should be a reasonable interpretation of the natural world which is rarely symmetrical. I'm going to use this guide as I layout and draw, but I'm going to also be flexible and I will vary from the guide if I find it too restrictive.
This ant character which I'm using is a thumbnail representation of a character. Thumbnails often aren't much more than glorified stick figures, in any case thumbnails are not highly detailed or intended as final work. The idea is to workout and visualize the major aspects of the action, but to do it as simply and quickly as possible. I don't want to invest a lot of time in my drawings at this stage because I may try many different approaches to working out the action and I don't want to waste time unnecessarily. But don't assume that just because it's not elaborately drawn, that this planning step isn't important or valuable. If I get this right the next steps in the animation process are infinitely easier.
I started out with an element for my ground plane consisting of a single cell that I will expose for the duration of this action. I have a second element which will also be a single cell for my vertical motion guide line and also exposed for the duration of the action. (Not to be confused with a motion guide used in key framed animation, this is just a visual guide) I also have a third element which will be made of multiple cells which I will use for my lines of action. (more on that in a minute) and I'll have a forth element which will also be multiple cells where I'll draw the actual thumbnails of the character. As this is a tutorial exercise and not a real scene for a project, I'm not restricted as to the total number of frames I will need for this action but I want the run cycle to be about 1 second long at 24 FPS so I'll shoot for doing it in about 24 frames.
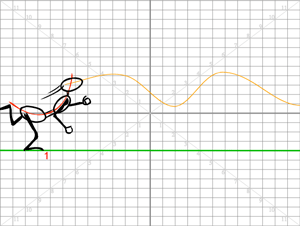
For each pose drawing my first step is to draw a line of action for that pose. (the red line in the drawings) I've talked about the line of action before in other articles and I can't stress how much more fluid and dynamic your drawings will be by starting with this gestural stroke. I also want to stress that the line of action of a pose should not be thought of in isolation but rather as part of a rhythmic sequence of connected poses that evolve into the action. I usually go through the entire action in a first pass and just draw lines of action and flip through the sequence over and over to get a nice rhythmic flow. It's very spontaneous and emotional and I want to try to capture the energy of what is happening without being bogged down with lots of specific details. (more on the TBS flipping technique)
I'm going to be animating on 1's because this is a fast run so even though I'm showing the odd numbered poses here, there will be a different pose for each frame in this sequence with the even numbers being filled in later as inbetweens. I'll draw the odd poses first and then I'll do the evens using onion skinning. (more on onion skinning and inbetweening)
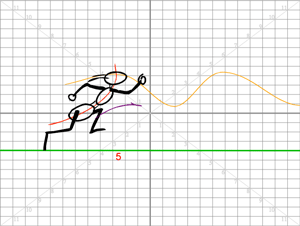
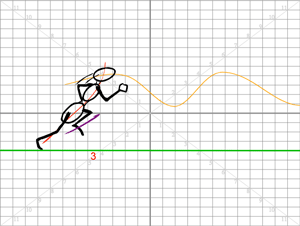
In these drawings you should note that I added a purple arrow to highlight the flow of the character's energy and weight. You might even recognize that there is great similarity in the forward and up and down motion to that of a bouncing ball, and you thought that bouncing ball animation exercises weren't important. They are really fundamental to many actions.
I mentioned earlier about the emotional and dynamic energy I captured in the gestural lines of action. I'm also constantly thinking about the character's weight, and center of gravity and how his body is twisting as he runs. As I draw poses and flip my drawings I'm constantly checking to see if the action looks right and I'm making corrections and thinking as I work. Animating is both emotional and cerebral.
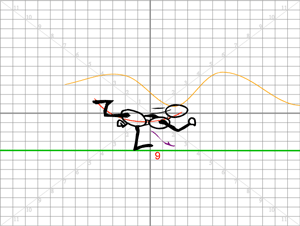
Just like the bouncing ball there is stretching and squashing going on in this action. When a character runs they aren't in contact with the ground all the time but when they do make contact they squash down as their weight lands and then they stretch out as they push off.
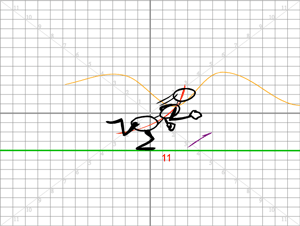
Also the hips and shoulders counter rotate and the arms and legs move in opposite pairs. These interactions are what I'm working to capture in these thumbnails. The end result is a running action. Once I have the basic running planned out, I can use this as a visual reference when I draw the detailed cartoon character. This may seem like extra work, but it isn't. It is just a great way to subdivide a complex task into more manageable steps.
Another important part of running is the pumping of the arms. A runner uses their arms when they run, they aren't just swinging about they are part of the over all locomotion.
I'm following my vertical guide curve and because it is asymmetrical my runner's motion is more natural. The character may be an ant but in the cartoon world he needs to run like a person.
Don't forget about all the arcs involved as an organic character moves. Arms, hands, elbows, knees, everything is following arcs of motion and they aren't the same arcs so there is plenty to keep track of as you make these pose drawings. There are a lot of details to develop, which is why keeping the drawings in simple thumbnail form is so useful. There will be plenty of time to play with details in the final character animation, but for now my goal is to produce a believable running motion.

A cartoon run is very exaggerated. We want it to be believable in terms of the natural world but at the same time we are trying to create an entertaining interpretation.
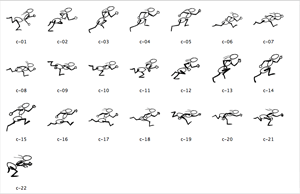
I'm not displaying the even drawings here but after I finished my odds I went back and created an inbetween for each even frame. The spacing of my inbetweens is basically balanced so that means they fall about half way between each odd pose. But there are times when I favored one pose or the other to accentuate acceleration or deceleration. Below is a library view of the cells that make up this running action.
Click on the image above to view an enlarged version
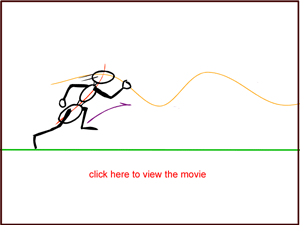
Here is the running action set up on 2's at 24FPS, the final action will be on 1's but I wanted you to be able to see things more clearly so I slowed down this version which includes the guides and action lines.
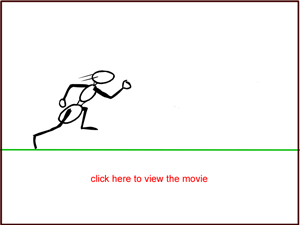
The final thumbnailed action is done on 1's at 24 FPS. It is just a total of 22 frames long so it happens very quickly. I made it into a loop, but the action could and most likely would lead into another action but we will leave that for another time. I hope you learned a few new things in this tutorial.
Examples of animation are often presented as highly finished pieces and there is a misconception that the animator started with the final version that is shown. I more often than not have to work through several stages before I get to a satisfactory final animation. One of those stages is a planning and visualizing stage where I like to do thumbnail drawings to work out the major aspects of the action. So in this tutorial I want to demonstrate this part of the creative process as it has evolved thanks to having software like Toon Boom Studio to facilitate the work. Thumbnailing for planning and visualizing is a traditional approach in animating but it has evolved beyond just doing a page or two of gestural drawings due to the ease in which we can quickly produce test movies using software. These visualization stages are actually lots of fun, so lets get started.
Now here is a trick that I'm often surprised is omitted in many explanations about animating an action. I suppose it is thought to be obvious, but maybe it isn't. If you are going to animate a character walking or running etc, you need to establish a reference to the ground. In this example it is as simple as a straight line, but it is critical, otherwise you don't have a way to relate the character's movement to the surface on which they are moving. This sequence is mostly a side view for simplicity sake, but references become even more important as the perspective of the scene increases in complexity.
Once I have established my ground plane, I usually will add some rough motion guidelines. In this example I added a vertical motion line because a cartoon run is not just forward motion, but it also has a significant up and down component. Here is an important tip: notice my vertical guide is not symmetrical. It is intentionally asymmetrical. Why? Because symmetrical is mechanical and not organic and it is also boring. Cartoons are fun and they should be a reasonable interpretation of the natural world which is rarely symmetrical. I'm going to use this guide as I layout and draw, but I'm going to also be flexible and I will vary from the guide if I find it too restrictive.
This ant character which I'm using is a thumbnail representation of a character. Thumbnails often aren't much more than glorified stick figures, in any case thumbnails are not highly detailed or intended as final work. The idea is to workout and visualize the major aspects of the action, but to do it as simply and quickly as possible. I don't want to invest a lot of time in my drawings at this stage because I may try many different approaches to working out the action and I don't want to waste time unnecessarily. But don't assume that just because it's not elaborately drawn, that this planning step isn't important or valuable. If I get this right the next steps in the animation process are infinitely easier.
I started out with an element for my ground plane consisting of a single cell that I will expose for the duration of this action. I have a second element which will also be a single cell for my vertical motion guide line and also exposed for the duration of the action. (Not to be confused with a motion guide used in key framed animation, this is just a visual guide) I also have a third element which will be made of multiple cells which I will use for my lines of action. (more on that in a minute) and I'll have a forth element which will also be multiple cells where I'll draw the actual thumbnails of the character. As this is a tutorial exercise and not a real scene for a project, I'm not restricted as to the total number of frames I will need for this action but I want the run cycle to be about 1 second long at 24 FPS so I'll shoot for doing it in about 24 frames.
For each pose drawing my first step is to draw a line of action for that pose. (the red line in the drawings) I've talked about the line of action before in other articles and I can't stress how much more fluid and dynamic your drawings will be by starting with this gestural stroke. I also want to stress that the line of action of a pose should not be thought of in isolation but rather as part of a rhythmic sequence of connected poses that evolve into the action. I usually go through the entire action in a first pass and just draw lines of action and flip through the sequence over and over to get a nice rhythmic flow. It's very spontaneous and emotional and I want to try to capture the energy of what is happening without being bogged down with lots of specific details. (more on the TBS flipping technique)
I'm going to be animating on 1's because this is a fast run so even though I'm showing the odd numbered poses here, there will be a different pose for each frame in this sequence with the even numbers being filled in later as inbetweens. I'll draw the odd poses first and then I'll do the evens using onion skinning. (more on onion skinning and inbetweening)
In these drawings you should note that I added a purple arrow to highlight the flow of the character's energy and weight. You might even recognize that there is great similarity in the forward and up and down motion to that of a bouncing ball, and you thought that bouncing ball animation exercises weren't important. They are really fundamental to many actions.
I mentioned earlier about the emotional and dynamic energy I captured in the gestural lines of action. I'm also constantly thinking about the character's weight, and center of gravity and how his body is twisting as he runs. As I draw poses and flip my drawings I'm constantly checking to see if the action looks right and I'm making corrections and thinking as I work. Animating is both emotional and cerebral.
Just like the bouncing ball there is stretching and squashing going on in this action. When a character runs they aren't in contact with the ground all the time but when they do make contact they squash down as their weight lands and then they stretch out as they push off.
Also the hips and shoulders counter rotate and the arms and legs move in opposite pairs. These interactions are what I'm working to capture in these thumbnails. The end result is a running action. Once I have the basic running planned out, I can use this as a visual reference when I draw the detailed cartoon character. This may seem like extra work, but it isn't. It is just a great way to subdivide a complex task into more manageable steps.
Another important part of running is the pumping of the arms. A runner uses their arms when they run, they aren't just swinging about they are part of the over all locomotion.
I'm following my vertical guide curve and because it is asymmetrical my runner's motion is more natural. The character may be an ant but in the cartoon world he needs to run like a person.
Don't forget about all the arcs involved as an organic character moves. Arms, hands, elbows, knees, everything is following arcs of motion and they aren't the same arcs so there is plenty to keep track of as you make these pose drawings. There are a lot of details to develop, which is why keeping the drawings in simple thumbnail form is so useful. There will be plenty of time to play with details in the final character animation, but for now my goal is to produce a believable running motion.
A cartoon run is very exaggerated. We want it to be believable in terms of the natural world but at the same time we are trying to create an entertaining interpretation.
I'm not displaying the even drawings here but after I finished my odds I went back and created an inbetween for each even frame. The spacing of my inbetweens is basically balanced so that means they fall about half way between each odd pose. But there are times when I favored one pose or the other to accentuate acceleration or deceleration. Below is a library view of the cells that make up this running action.

Click on the image above to view an enlarged version
Here is the running action set up on 2's at 24FPS, the final action will be on 1's but I wanted you to be able to see things more clearly so I slowed down this version which includes the guides and action lines.
The final thumbnailed action is done on 1's at 24 FPS. It is just a total of 22 frames long so it happens very quickly. I made it into a loop, but the action could and most likely would lead into another action but we will leave that for another time. I hope you learned a few new things in this tutorial.
Labels: Tutorial


1 Comments:
very nice =) i'll be sure to play around with some of your methods =) thankyou
Post a Comment
<< Home