Introduction to Photo Cut-Out Animation Part 3
In part 1 and part 2 of this series on photo cut-out animation; I used the graphic of a caricature of Friz Freleng and the Pink Panther to demonstrate how to convert a single graphic into a fun animation. In part 3, I’m going to try to demonstrate even more cartooning that you can do with the new "Import and Vectorize with Texture" feature of Toon Boom Studio V4.0.
Bar Chart of Sound Snippet (click to enlarge)
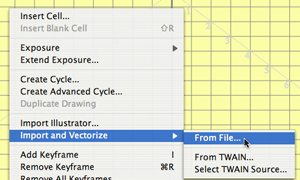
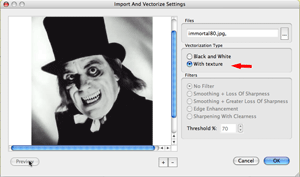
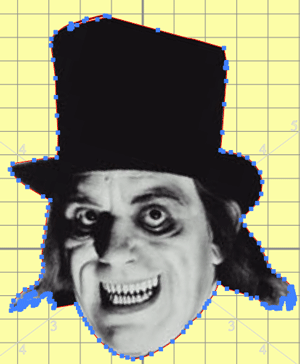
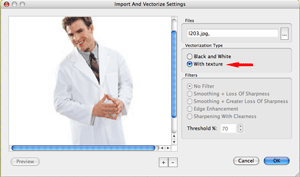
I’m ready to start creating my character photo assets to animate. I found a great wacky ghoulish looking photo to be the head of my cartoon character. So I just need to import this photo into a drawing element using the “import and vectorize with texture” command.
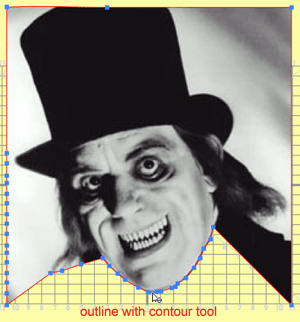
Now that I have the photo imported into my drawing element, I’ll use the scissors tool to do a “rough” cut-out of the character’s head. I pull a bounding box around the desired picture area and drag it to separate it from the rest of the photo. Then using the drawing select tool, I select the unwanted part of the photo and delete it. Next I switch to the contour edit tool and begin the process of adding contour points to the outline of the head and dragging those contour points to define the head’s outline.

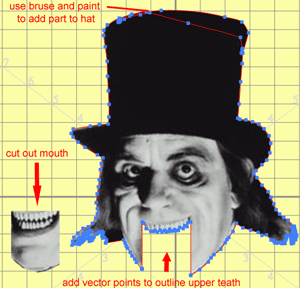
The ends of this character’s wild hair presents a bit of a challenge, so I zoom in and use the eraser tool to clean up the details of his hair. As you can see using the eraser should be limited to only when you need that level of fine detail as it produces a lot of vector points
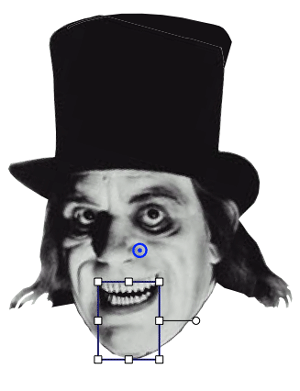
Now I’m ready to create his mouth. There are many ways to approach this, but I’ll just show you a typical JibJab style of mouth. I use the scissors tool to select the part of the head that I want for his mouth and drag it off to the side. Then I will use the contour edit tool to add contour points and drag those points to reveal and detail his upper teeth. A really nice thing about the use of “vector boxes” for bit maps is that they essentially are like “masks” and when you pull down on those contour points where his teeth use to be before you cut them out as part of his mouth, you will find that the upper teeth are still there to be included in this part of his head.
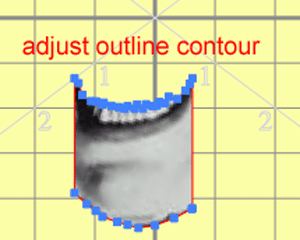
I next will cut the drawing object for the mouth and copy it to a new drawing element. Once I do that, I’ll use the contour edit tool to add contour points and outline the lower teeth for his mouth.
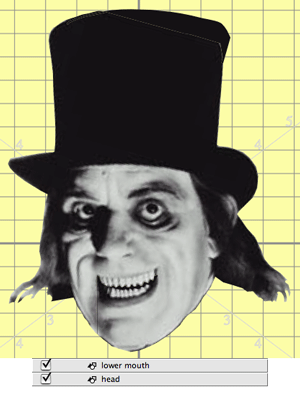
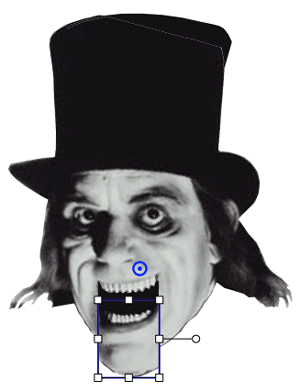
So now I have the head as one element, and the lower mouth as a second element. I will go to the head element and in the void where I removed the lower mouth, I want to add a solid black shape which will act as the inside of his mouth when I move the lower mouth as he is singing. This is done by drawing a stroke line to close the space at his chin and using the paint tool to fill the zone created. Below are the head and lower mouth elements lined up in drawing view to show his naturally closed mouth.
Now to make him “talk” I will just keyframe his lower mouth element using the scene planning transform tool to open and close and position it as required by the song.
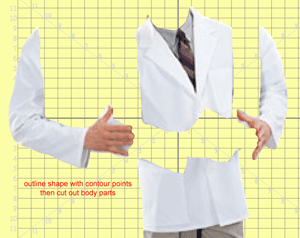
I spent some time looking for a good photo to use as his body and once I found one that looked promising I imported it into a drawing element using the “import and vectorize with texture” command just like I did with his head photo.
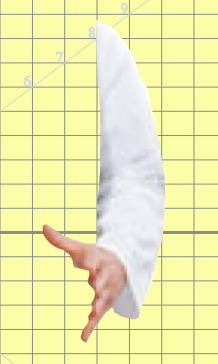
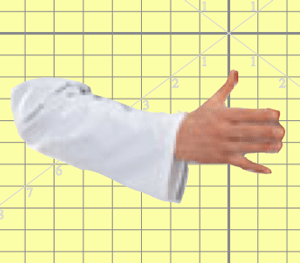
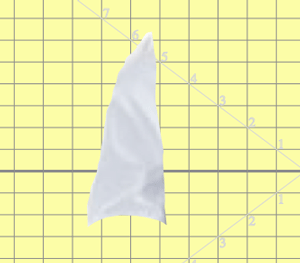
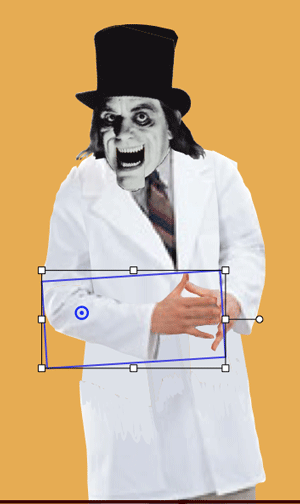
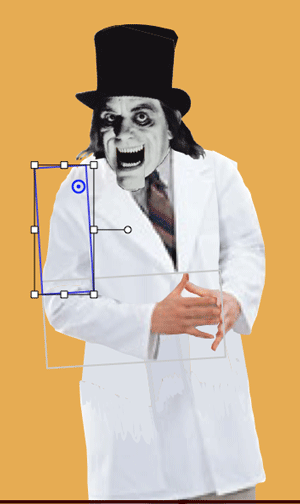
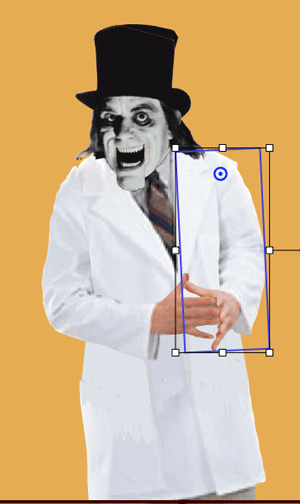
Then using the contour edit tool to first outline the main shape and then the cutter tool to cut-out his arms from that shape, I am preparing the characters body parts. I cut and paste the left arm to a new element and the right arm to a new element. And I also separate the lower part of the right arm and cut and paste it to its own element.
I also have to use the stroke tool and the paint tool to clean up the coat part of the body where his hands use to be. Now, I switch to camera view and using the scene planning select tool, I composite all these elements to produce a photo cut-out character and in the time line I set up his hierarchy.
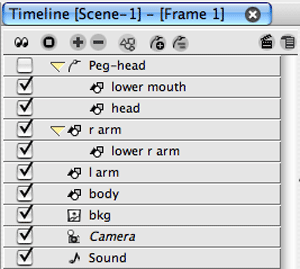
I then use the scene planning rotation tool to position the pivot points for each of his body parts so that they will move naturally.
Lower right arm
Upper right arm
Left arm
Now I’m ready to create the character’s performance of the song.
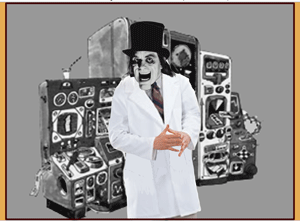
Click this picture to view the final movie
I hope this tutorial gets you really motivated to try making a JibJab style cartoon of your own. They are very entertaining and fun to produce.
Labels: Tutorial


8 Comments:
Hallo, since I am new to TBS, I was rather surprised to hear, that the import and vectorize feature is a new one in Version 4.
Thx for this great tutorial - what I do is Photo CutOut Animation, but I do the rigging in Photoshop where I have the tools to mask all the cuts realistically. So, your post made me wonder - if I have all my character components allready rigged and prepared, do I have to import AND vectorize them, or would import them as images work as well?
In other words, is there something - by means of animating - I can't do with images but only with vectors?
Greetz,
Peter
Peter,
I am not sure if you would gain any advantages by using the import and vectorize with textures into a drawing element VS importing your image into an image element except that you can integrate vector drawing objects inside the same cell in the same drawing element. I could see where that might be useful in some cases. It would be worth some experimentation to find out any other advantages. There don't seem to be any disadvantages.
thank you very much, jk, for answering so quickly!
I am working on a photo cutout music video of 3min12sec. i had to have this questions answered before switching from photoshop to TBS.
Approx. 100 - 150 detailed photocuts and layers have to be imported into TBS. I don't want them all to be imported as images, resized, jointed and attached to pegs, just to find out I should have used vectorized versions instead...
And yes, there is at least one disadvantage, I think: Very detailed photograhpy tend to produce VERY large file sizes when vectorized. (4 versions of my main character's head, imported into image elements: 8 MB; the same pictures imported into drawings: 445 MB!)
thank you for your help & this unique blog (as well as your other blogs),
peter
Excellent. I look forward to seeing your finished video. E-mail me a link when it's online. And if you have any additional questions, you know how to reach me directly or thru the Toon Boom Studio forums.
Thank you for another great tutorial. I had two questions that I wanted to ask. On the picture clean up step, are you using ToonBoom to select the correct color for your clean up? In other words, if I am working with a photograph, is there a way that I can use the dropper to pick the exact shade of some element of the photograph and then use that color to clean up the part of the photo where I cut parts out?
Yes, if you use the dropper that is part of the color editor dialog you can sample any color that you have on your computer display and capture that color to a color swatch in Toon Boom. If you are wanting a really complex texture you can use PhotoShop to isolate that texture into a small bitmap image and then import it to a swatch as a texture. So these are are two ways to get either external colors or textures into TBS color swatches.
I'm trying to follow this tutorial with a very simple cut out. I'm just cutting the head off of a body. All is cool until I try the step where you say to separate the cut out part and copy and past it to frame one of the new drawing element in the timeline window.
I have the head selected, use the paste command but when I select the frame on the new element for the head I can't even get the option to paste it.
I love your tutorials. But for some reason the program seems to have a lot of little hidden secrets that just make it very unintuitive.
Thanks.
I'm using 4.5 on a Mac. Latest OS.
The "trick" so to speak has to do with "focus" which is a technical term in window based applications where a pane has to be selected to make it active and enable certain commands. In Toon Boom the copy and paste commands for elements require that either the Drawing View or the Camera View pane have focus. So when you selected the frame in the Timeline pane the "focus" is transfered to that pane and all you need to do is click anywhere on the Drawing or Camera pane to give it back the "focus" and then the paste can be made. It's a common complaint that this shifting "focus" exists but it is caused by the way the software treats each pane in the context of "focus". This info should solve your problem and I'm always glad to help and glad you like my tutorials. -JK
Post a Comment
<< Home