Key Framed Animation Part 3
Please be sure to review
before you continue with these next parts of this series.
I have created a demonstration scene to act as a reference to these articles on Key Framed Animation. It will hopefully serve our purposes well, as over a series of additional installments on this topic we will have plenty to discuss in uncovering the behind the scenes techniques of this scene.
From here forward in this series on Key Framed Animation we are going to be exploring how to implement the techniques we touched on in the first two parts.
Except in the case of an animation practice exercise, like creating a simple character walk cycle, an animated cartoon scene is created as part of telling a story. The story and its requirements precede the planning of the scene. In our demonstration scene we have a fish named Filbert who is swimming along casually until he comes to a brief stop and suddenly reacts to a shark head on. Filbert then turns and exits very quickly fleeing for his life.
The scene is underwater so we need to design and construct an underwater environment as well as to make the appropriate character animation.
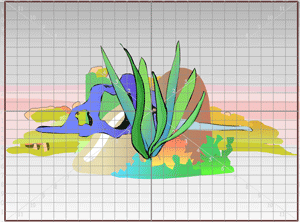
Here is our demonstration scene
I wanted to show you the scene up front so that you would have a good idea of what the final result will be. Getting to a successful result is what these articles are all about.
Choices
Animating is full of choices related to how we want to create our work. There is always more than one way to do almost everything and as a TBS user as you become more experienced you will find even more alternatives. When first learning TBS just try to stay open minded and keep reminding yourself that there are lots of choices possible. I have an expression I use often which goes: “don’t confuse the effort with the results”. In creating animation it is the final results that count not how easy or how hard you worked to get to those results. Hopefully you will enjoy the process of creating animation, if not, you might consider doing some other type of activity.
As I go along in these articles I will try to point out useful practices and tips, these aren’t rules and you can incorporate them in your own workflow or not. Each animator has to decide what works best for themselves in their own work. The way that I approach something is one way and certainly not the only way.
Getting Started
To do a scene you should create some rough sketches as part of your visualizing. I like to do lots of small thumbnail sketches to explore different ways to view the action required by the story. It is also usually a good idea to create some scene layout sketches to determine the most effective placement of the characters and props. Remember you are basically starting from scratch and therefore have to design and create everything about this scene.
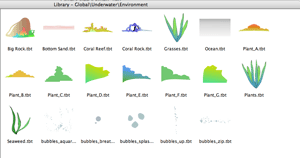
For our underwater scene I identified many items of scenery or props to create the appropriate environment. Things like rocks and coral and sand and plants as well as some special animation effects to help provide a sense of being in water. Things like seaweed moving with the current and rising air bubbles. I created all of these items in Drawing View as individual elements. And once created they can be assembled into a composite setting in Camera View to match my visualized layout sketches.
Also I have collected all of my scenery assets into a section of my global library so as to make them available for reuse in future scenes or projects. I’ll do a series about building and using your libraries in some future articles.
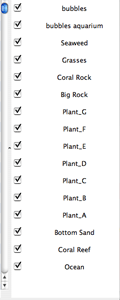
Each piece of scenery or prop is a column in my exposure sheet for this scene. I have organized them into a rough layered order but the real layout and organizing of the scene will be done in Camera View when I assemble the environment.
As you can see below I created the elements without worrying too much about the way they would fit in the scene layout. I drew them at a comfortable size and usually centered them in my Drawing View grid. Why? Mostly it is personal preference.
The exceptions were the seaweed and the various bubble effects. All of which I animated in Drawing View taking advantage of the field guide and the onion skinning feature of TBS. This brings up an important animator’s choice. How to create an effect or an action? Do I hand draw the animation in Drawing View using full or limited animation methods? Do I create the animation in composition using keyframing techniques? Or, do I create the animation by using the camera and cinematic techniques? It’s all comes down to making choices that you feel will work best for you and your situation. For the seaweed and the bubbles I knew I wanted to be able to reuse these effects again and I personally like doing these types of effects in Drawing View the classical way.
So as you can see I now have a bunch of scenery assets and effects that need to be assembled to create my underwater environment. To do this I will work in Camera View and use the timeline and top and side view panels.
Static Values Applied to an Element
In scene planning and layout in TBS we encounter two kinds of element attribute values, static values and dynamic values. Static values are applied to an element when it is first placed in the scene. They are applied and then left alone. That’s why they are static values because they don’t vary with the passage of time. Dynamic values vary over time. They are often referred to as animatable values for just that reason. It is the dynamic values that we assign through the use of keyed frames. But first we need utilize an element’s static values.
Here is an important guideline. Don’t do any keyframing to an element or hierarchy of elements until you have applied all of their needed static values. And once you start keyframing, don’t mess with an element’s static values. Why? Because changing static values on an element after you have started key framed animation is a sure way to destroy a lot of your hard work.
So what are these static values? How do we use them? And how can we avoid messing up by miss using them?
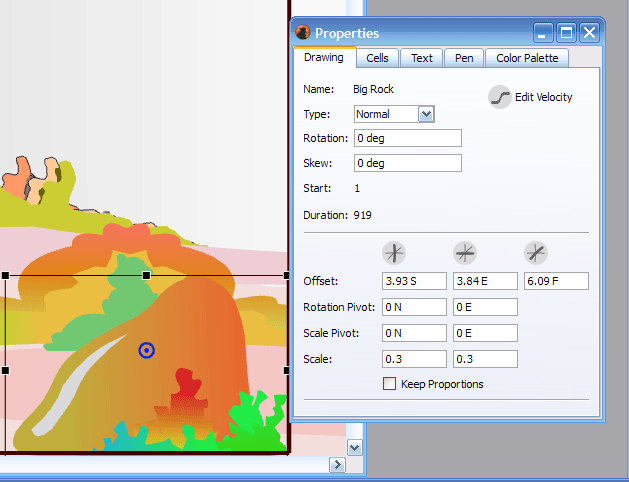
click on the image to enlarge
When you switch to Camera View from Drawing View you are moving from viewing your elements in 2D space to viewing them in 3D space. Now if you do absolutely nothing to the element beyond what you did in creating it in Drawing View then it would be seen and be rendered exactly as drawn. That would be a lot like shooting a pencil test without using any of the features of your animation camera stand. Of course TBS provides us with this wonderful multi-plane camera stand with all sorts of cinematic capabilities so we sure want to take advantage of it. Therefore we need to place our elements in 3D space to get the result we want. This is done by setting static values for the elements 3D location (North-South-East-West-Front-Back coordinates) as well as values for the elements scale and rotational orientation. These modifiers are applied to the Camera View representation of the element. The actual element in Drawing View is not changed. Now it is important to note that we are talking about modifying the entire element when we apply these static values. That means every cell in your exposure sheet that is part of that element is displayed in camera view according to these values. We can also set static values for the rotational pivot point for the element and the scaling pivot point for the element.
The scaling pivot point is set by selecting the scene planning scale tool and dragging and positioning the green circle. The rotational pivot point is set by selecting the scene planning rotation tool and dragging and positioning the green circle. Once these pivot points are set they remain in that position. Now here is a important warning. Don’t try to relocate either of these static pivot points once you start setting keyframes for this element. These pivot points are static not dynamic so they are not able to be keyframed. If you set keyframes on your element and then move the associated static pivot point then all the values you keyframed will now reference a different pivot location and the results across your animation will be unpredictable at best. If you ever need to manipulate an element on a one time basis for a specific keyframe setting with a different pivot point, the scene planning transform tool allows you to use a temporary pivot point.
All of the other static values for positioning and orienting an element in 3D space before animating it with keyframes are applied by selecting and using the scene planning select tool. Or you can make text box numerical entries on the Drawing tab of the Properties panel while the desired element is selected by the scene planning select tool. Here is another important warning. Don’t get confused and try setting values on the Drawing tab while using another scene planning tool and think you are setting keyframed values, you aren’t. You are setting static values and this inadvertent changing of static values while keyframing produces results across your animation that will be unpredictable at best.
So here are my personal guidelines for the setting of static values to be applied to an element or hierarchy of elements. Always set these values before starting any keyframing for those elements in your scene. And, only use the scene planning select tool on the first cell exposure frame for the element in your timeline. Now these static values are globally applied to the element and not keyed to a specific frame, and the scene planning select tool is only used to set static values and never keyframed values, so if you always remember to only use the scene planning select tool on the first cell exposure frame of an element then you will not be trying to do keyframing with this tool and inadvertently messing up your other keyframed work. It may seem like I’m spending a lot of time warning you about the dangers of changing static values after you start keyfaming an element in your scene but this is a huge source of problems for many TBS users and often blamed as bugs in the software when the keyframed work suddenly seems to go haywire. It almost always is caused by changing a static value after the fact and once you do it, fixing the ripple thru effect is often not easy to say the least.
So now we are going to compose our underwater scene using the scene planning select tool to position each element in 3D space. We will visually do some of the manipulations in the Camera View panel but some of the settings are easier to accomplish using the top view and side view panels.
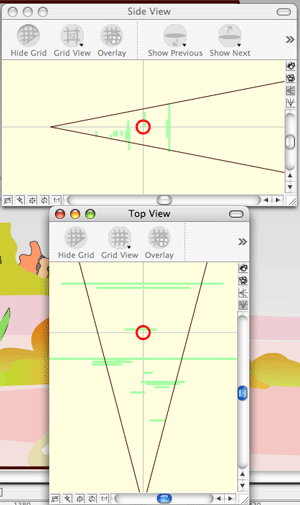
As you can see I was very busy positioning all these scenery and effects elements to compose this underwater environment. Each green line in the top view and the side view represents an element. The brown triangular shape is the camera’s viewpoint which widens as you move away from the camera’s lens. Top view is used to position elements East – West and Front – Back. Side view is used to position elements North – South and Front – Back.

Now that I have the scene set up, I also need to extend the exposures for the various elements to have them show for the desired time in the scene. I actually usually do this in the Exposure Sheet before I even start putting things in 3D space. Then there are a couple more useful practices that I like to follow. I create a separate peg element in the timeline and attach all of my scenery and props scene elements to it. I’m going to use this peg element as a timeline folder to manage my elements track display. I can collapse the “folder” peg as I shouldn't need to deal with these tracks while I'm doing the character animation or camera work for this scene.
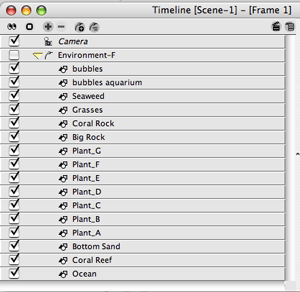
This is the track list un-collapsed.

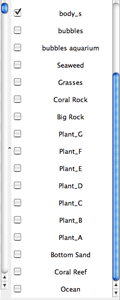
This is the track list collapsed.
I also go to my Exposure sheet elements list and uncheck these elements. This has no effect on Camera View work; it just cleans up my Exposure Sheet by hiding elements I most likely won’t need to view. I can always unhide them if I need to.
Notice that up until now I haven’t mentioned setting any keyframes yet. That’s because I haven’t had to use any so far to set up the environment of this scene. The only animation up to this point was the seaweed and the bubbles and that was done classically in Drawing View not by using keyframed animation. That’s a lot to read and digest for now, so next time in Key Framed Animation – Part 4 we will begin to work on the character animation and camera animation parts of our scene. And that’s when we will be using keyframing.
Labels: Fundamentals, Key Framed Animation, Key Framing, Scene Planning Tools


4 Comments:
Great stuff as always, JK. Thanks again for taking the time to do all this, I get something out of these no matter how many times I read them.
You're going to have your own "animation wikipedia" here soon, with the exception that your information is correct....
Looking forward to part 4,
Pat
I'm having issues trying to use the "transform" tool pivot point on a rigged character. I'm sure I must have made the mistake you had warned about. When I try to rotate with it, the animation between two keyframes moves the point in a wide arc instead of on a single point.
There are red circles, motion points I suppose, that move the pivot point away from where I need it during the animation. I'm sure this is my problem, but I can't seem to be capable of fixing it.
Do you have any suggestions?
Great site, btw. I'm using it a ton.
The red circles are just there to represent pegs. You can hide then if you want.
The blue pivot point for the transform tool is a temporary location when you move it. The rotation tool is used to set the green rotation pivot point which then remains as placed for the entire scene unless you move it again with the rotation tool which is not a smart thing to do.
So you set the rotation pivot point one time with the rotation tool and then you perform all rotations using the transform tool. You almost never move the pivot point with the transform tool except in those rare cases where you need to have a temporary change in its position. As soon as you deselect the object the pivot point returns to the setting made with the rotation tool.
I'm glad the blog is helping you, you might want to consider asking questions on the Toon Boom Studio forums as that is a better place to discuss things in detail.
any chance of getting the project file(s) used for this? I think it might be easier to grasp if I could look at project in toon boom, as I study your tutorial. Thanks for considering! Phil
Post a Comment
<< Home