Key Framed Animation Part 1
This article is the beginning of a series that will explore “key framed animation”. If you haven’t read It’s Elemental Part 1 and It’s Elemental Part 2 then I strongly recommend that you read them before proceeding through this series of articles.
Vector Art
Simplistically speaking, there are two primary methods in which computer software creates and interprets graphical images. One method is by mapping pixels with information that point by point stores the image. This is often referred to as Raster Graphics or Bit Mapped graphics. A second method of graphical representation is referred to as Vector Graphics which are based upon mathematical equations to represent graphical images. In the Toon Boom Studio world of computer animation, we primarily work with vector art. Because vector art is stored by computers as mathematical expressions which are rendered into visual images for viewing; they are uniquely suited to animation production. These expressions can be easily manipulated and rendered with virtually no loss in picture quality. This is due to the fact that the manipulation of the art work can also be expressed mathematically by applying numerical values for various attributes. For example, the scale, the rendered size, of the art work, can be modified by applying a scaling factor. The rotational orientation of an art work element can also be manipulated by applying a rotational factor. The location or position of the art object in a frame’s North South East and West coordinate grid can also be generated by applying numerical values. Even distortion of the art, referred to as deformation or skewing, can be captured as attribute values. All of these manipulation values can then be applied at a specified time by Toon Boom Studio's rendering engine to generate a desired visual image. When we use the term “animatable” with regard to the manipulation values for the attributes of how art work elements will be rendered, we are referring to the fact that these particular attributes of the art work (scale, position, rotation, deformation) can be varied as a function of time creating the illusion of motion. So to use the computer to generate when and how these rendering changes will occur, we need a way to record and tie each attribute modification value to a specific point in time.
Keying Attribute Values to Frames
For any animation, time is converted into frames by means of a conversion formula based on the frame rate of presentation called the frames per second or FPS. Therefore to locate a specific point in time inside our animated scene, we will actually identify a frame number along our scene’s time line. The recording of a specific type of attribute value (scale, position, rotation, or skew) to control how the vector art will be rendered at a specific point in time is called a keyed frame value. This is often shortened and referred to in discussions as just a keyframe. This term is merely being used to show that a specific attribute manipulation value has been recorded to be applied to a specific piece or pieces of art work at a specific point in time. The value (scale, position, rotation, or skew) has been keyed, locked down and registered, to a specific frame number, a point in time.
Important conceptual note: The term keyframe is not always singular and most often is used to represent a set or group of multiple attribute types all keyed to the same object or objects at the same frame. Remember that a graphical object has many different attribute types that can be manipulated simultaneously. In Toon Boom Studio we can set keyed frame values one at a time or in groups. The term keyframe is used for the setting of these values and actually can and does refer to multiple values of different types together as a group (scale, position, rotation, and skew values). Toon Boom Studio provides track indicators at a single frame to show which types of values have been keyed to that specific frame. So please be aware that when you read the word keyframe you need to understand the context of how it is being used, either to refer to a single keyed value type or to refer to a set of multiple value types all in a group at that specific frame. This has proven to be a major source of confusion for many people.
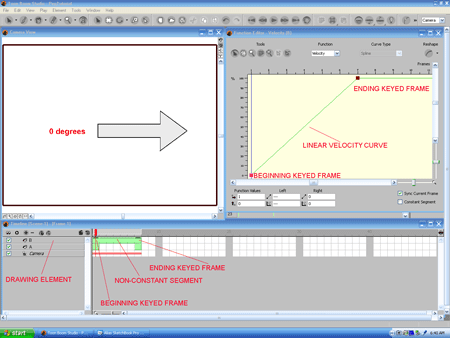
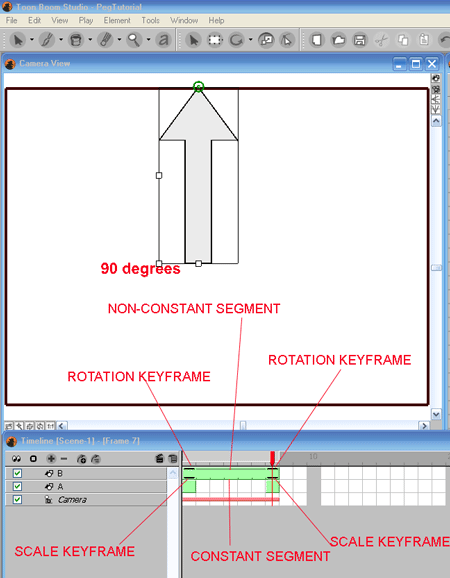
Now one of the most powerful capabilities of computer animation software is its ability to fill in the logical transition, progressive changes, between two key framed attribute values of the same type, a beginning keyframe value and an ending keyframe value. This computer generation of transitional values is appropriately referred to as "tweening" which is short for in-betweening. The number of attribute value changes that the computer will generate depends on the number of frames specified in between the beginning and ending keyed frame attribute values. So for example, if we assign a keyed frame rotational attribute value of 0 degrees to an element at frame 1 and a keyed frame rotational value of 90 degrees for that same element at frame 7. Then in between frames 1 and 7 there are 5 frames and therefore 5 transitional values of rotational positioning that the computer can generate. The sequence of frames from a beginning keyframe value to the ending keyframe value of the same type, 7 frames in our rotational example, is called a segment. For any segment defined by a starting and ending key framed value pair, we can specify how the render engine will generate the in between transitional attribute values. If we just want the render engine to hold the beginning keyframe value constant until the ending keyframe value is reached, then we specify that the segment is a constant segment. This produces a “snap” or jump from the beginning attribute value to the ending attribute value. On the other hand, if we want a gradual transition in between the beginning keyed frame value and the ending keyed frame value; we will specify that the segment be a non-constant segment. By default, non-constant segments are generated linearly, which means that the rate of transition is equally spaced between values. So in our example where we have 5 in between frames between rotational values starting at 0 degrees and ending at 90 degrees, we would have attribute values created of 15, 30, 45, 60, and 75 degrees respectively. The linear rate of change is 15 degrees per frame. This is in effect an even or balanced distribution of the change in the controlled attribute. If we wanted these values to be determined differently, we could either increase the number of in between frames that make up the segment, or we could, use the TBS Function Editor to specify a different mathematical curve to be applied to control the generation of attribute value calculations. In terms of traditional animation, the variation of the function curve is the same as adjusting the spacing of the in between drawings. This is how cushioning or easing is applied to our animations generated by the aid of the computer render engine. If you want to learn more about timing and spacing in animation read these articles Understanding Timing in Animation. 
"click" on the graphics to see their enlarged versions
So key framed animation is a technique of producing the illusion of motion by letting the computer software’s rendering engine generate a sequence of changed images mathematically using an in betweening calculation method which is controlled by a transitional equation visually represented by a function curve. The animator specifies key images by using key framed values to set the boundary conditions of the movement. Then the animator specifies to the rendering engine, his/her assistant, how many frames to use for in between images and how closely to space those in between images relative to each other. If this sounds a bit complicated, complex and technical that’s because it is. When you are doing key framed animation you are essentially programming the actions of the software’s rendering engine. In Toon Boom Studio, you aren’t writing code to program the render engine (in Flash that is called Action Script) but rather you are using scene planning tools and keyed frames and function curves. But it's programming none the less.
Next time, in Part 2 of Key Framed Animation we will begin to discuss dynamic elements called pegs and see how they are applied.
Labels: Fundamentals, Key Framed Animation, Key Framing


2 Comments:
I can't find anywhere in a learning track directions for cutting up the parts of a character in order to animate them. I finally have decided that I cut a part and paste it onto a new element (screen). In the end then the whole originally drawn character has disappeared. Is that correct? Then how to I keep a completely rigged character in the library to use another time?
Look at the tutorial called
Building A Cut Out Character in Toon Boom
for details of the process.
Once the character is built collapse the top level parent peg and drag it to your global library as a template.-JK
Post a Comment
<< Home