***** Please Don't Forget To Visit My Web Comic *****
![BugPudding Webcomic]()
Animating Cut-Out Characters - Part 3
Here is the long awaited part 3 of my series on animating cut-out characters. I apologize for the delay. If you have not read Animating Cut-Out Characters - Part 1 or Animating Cut-Out Characters - Part 2 previously then I suggest that you do so before proceeding here. We are doing a pose to pose approach of keyframe animating a character walking. By pose to pose we mean that we layout important key boundary poses first, often referred to as extreme poses. Then we go back and fill in between those extreme key poses additional key poses, and then we go back and fill in more in between poses until we are satisfied with our animating of the walk. An alternate approach is to animate straight ahead which is how I did the walk for my Animating a Cut-Out Character in Toon Boom tutorial. Either approach is valid and useful and quite frankly a combination of the two approaches is more natural. Pose to pose sets up the basic animation and straight ahead is great for tweaking and smoothing. A question that often arises about the work flow of keyframe animation is "why do you not want the segments between keys to automatically be set to non-constant segments as you lay down the keys?" The answer is this is a personal choice and TBS is designed to work either way. I believe that tweening while setting keys interferes with my seeing the work evolve during flipping or onion skinning. Automatic tweens are defined by the keys on each end of the segment. So they don't really exist as a pose, they just reflect other poses which can be confusing. If we were hand animating we wouldn't see those final inbetweens while laying out our main poses so having automatic tweening turned off is just a more natural way to animate.Most of the instructions and the actual resulting movies are contained in the slide show so take your time, navigate using the Previous and Next arrows provided and backtrack through the slides as needed to follow along. As always, read the tutorial all the way through a couple of times and then do the work on your own as that is the only way to learn. Don't be afraid to experiment and expect to make a mistake or two as you go. We all learn from our mistakes, hopefully. I hope you enjoyed this tutorial series and learned some new skills. If you have questions or comments be sure to communicate them to me either at the Toon Boom Studio User Forums, The Discussion Area of The Cartooning In Toon Boom WIKI, or directly via e-mail or use the comments section here on the blog.
Labels: Cut-Out Animation, Key Framed Animation, Tutorial
Animating a Cut-Out Character in ToonBoom
This is the third part of our new tutorial series on creating and animating cut-out characters in ToonBoom Studio. If you haven't read Building a Cut-Out Character in ToonBoom or Rigging a Cut-Out Character in Toon Boom previously, I suggest that you do that before proceeding here.
Perhaps the most difficult aspect of this type of tutorial is the extensive complexity of the steps involved in performing key framed animation. I'm going to try my best to show you the most significant steps and to provide you with some helpful guides to assist your work. It isn't that difficult, but key framed animation is tedious and requires that you take your time and be very aware of what you are doing and how your are working. And just because you are not making individual drawings, key framed animation is still animating, so not only does it involve knowledge of using the software it also requires animating skills just the same as if you were hand drawing the animation. So you still have to deal with poses and timing etc. It takes practice, so let's get started.
I'm providing HERE a download of a SWF file that you can import into TBS to use as a pose guide for this animation. It will help you in positioning and posing the bird and in laying out the first thirty frames of the bird walking. So this first slide presentation will show you how to import the SWF into your project. If you download the ZIP file be sure to unzip it and remember where you put the walk0.swf file so that you can navigate to it in the file dialog when asked.
You can do that SWF import now or later when you are actually doing your animation. It is strictly provided as a aid to setting up the poses for the bird character. If you want to do your poses without using the guide that's a personal choice. I didn't have it when I did the animation myself, but then again I have done plenty of character walks in my career, so I just used my past experience to create the poses. In any case we will begin animating in the next slide presentation. My approach is to animate in multiple passes. So the first pass will be to get the basic walking animated and then in future passes we will refine the walk by adding movements of other body parts. Also I'm using what is termed as a straight ahead approach. Instead of doing certain key poses first and then doing inbetween poses, I'm doing each pose in sequence. You can key frame animate using either approach. I felt it would be easier to follow by showing the animating straight ahead style. The first pass roughed in walk
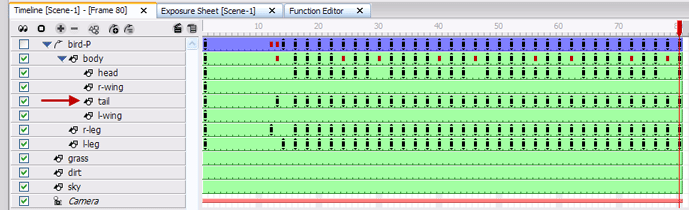 Fig. 1 The timeline for our second pass of the walk where we animate the tail
After we have completed animating our rough walk in the first pass we are ready to go back through the timeline and make a second pass. This time we will just focus on animating the bird's tail feathers to add to our existing poses. We will leave "bird-P" expanded and we will just select the tail track label. Then we can step through the frames using the [S] key to move ahead to the next frame and the [A] key to move back to the previous frame. All animating is done using the scene transform tool (7). Remember in a walking motion the bird's rear end (tail feathers) will probably move up and down opposite the main weight shifting of the bird, sort of a counterbalancing motion. The second pass walk with the tail movement added
 Fig. 2 The timeline for our third pass of the walk where we animate the wingsAfter we have completed animating the tail movement in the second pass we are ready to go back through the timeline and make a third pass. This time we will just focus on animating the bird's right and left wings to add to our existing poses. We will leave "bird-P" expanded and we will just select the appropriate wing's track label. Then we can step through the frames using the [S] key to move ahead to the next frame and the [A] key to move back to the previous frame. All animating is done using the scene transform tool (7). The idea behind doing multiple passes is that it allows us to focus on small details. We are really trying to add some personality to the rough walk. Remember in a walking motion arms (wings) move counter directional to legs. The third pass of the walk with the wing movements added
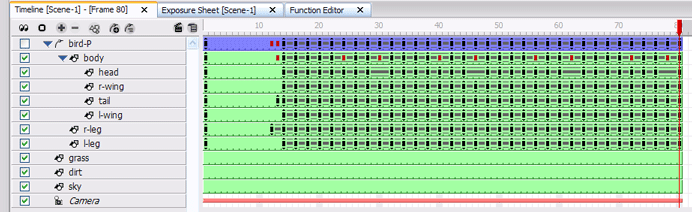 Fig. 3 The timeline with non-constant segments added between the keyframes.After we have completed animating our third pass we are ready to go back through the timeline and set non-constant segments between each keyframe on each element. This is just like having an assistant animator make inbetween drawings between each of our pose drawings. This "tweening" step adds a degree of smoothing to the walking movement. Many animators will stop after this step but it all depends on what you are trying to accomplish. All setting of non-constant segments is done with the scene transform tool (7) actively selected on the tool palette which insures that tweening is applied to all types of keyframe parameters. (location, scale, rotation, skew) The easiest way to make these tweening settings is to collapse the "bird-P" peg and set the segments between the keys on that main character peg letting the settings just reflect down to all the "hidden" children elements. The fully tweened version of the bird walking
That completes this installment in our series on building, rigging and animating a cut-out character in ToonBoom. In the next part of this series we will see how to remove the "tweening" and adjust and tweak the walk to make it even better.
Labels: Cut-Out Animation, Key Framed Animation, Tutorial
Rigging a Cut-Out Character in ToonBoom
This is the second part in our new tutorial series on creating and animating cut-out characters in Toon Boom Studio. If you have not read Building a Cut-Out Character in ToonBoom previously, then I suggest that you take time to do that now.
In the first part of this series we imported the black bird character into TBS. We outline the character using the drawing contour tool. Scaled the drawing to fit inside our 12 field guide. Then we cut out many of the bird's body parts and distributed them on to separate elements and then re-positioned them using our original drawing as a guide. We are almost finished with the cut-out phase of the building process, but we have a few more body parts to create before we can begin the rigging phase.
The previous slide show took us through creating the left wing and the left leg for the bird character. That completes the cutting out process for this tutorial series and we are ready for the next phase which is rigging the cut-out character for animating.
Note: You might be thinking " why not do additional parts for animating this bird like separating the pupil from the head so we can move it, or separating the lower beak so we can animate his mouth?" The answer is we certainly could have done that, but I chose not to because I wanted to leave you some future challenges for going off on your own when you finish the tutorial as presented. My goal is not just to show you step by step how I did something, but rather to inspire you to understand the steps so that you can expand that understanding to do your own work and to experiment with TBS further.
So let's get going with rigging this black bird. Rigging is a term used to describe the setting up of the control hierarchy of the cut-out character. It includes the ordering of the body part elements, the assigning of parent-child control relationships, some special 3D space adjustments of appropriate body parts, and the locating and setting of pivot points to provide more natural movements.That wasn't too dificult. We had to re-order some of our track layers and make some grouping selections and drag and drop labels to attach children elements to parent elements to create a control hierarchy. And we had to take advantage of 3D space to bump some body parts forward or backward in the display planes to compensate for changing the natural layering order of our track labels while constructing the hierarchy. Then we determined the locations of pivot points that would provide more natural movements when we start animating the bird. Of course the rigging does require some advanced planning and understanding of how we will be using the particular cut-out character. Things like breaking the character into two groups in the hierarchy to allow him to bend above the legs and positioning the wings so that when they move they don't get in front of or behind other body parts. It takes practice and experience to spot some of these potential issues and you, like me, will occasionally have to go back and adjust a rig design when you hit a problem during animation. That can be painful if you don't find it upfront before doing a lot of animating work, so I always try to test a rig by trying to make lots of poses with it for practice before I really start significant animating work.
Note: One sage observation on character design and rigging, don't assume that you can build an all inclusive layout or rig to cover every possible situation. Be prepared to build many rigs which are designed to address specific animating needs. Over complicating a rig to be all purpose makes animating more difficult and frankly never works as well as doing specialized separate rigs for specialized needs. Changes in points of view (profile, perspective, front, and back views) require separate cut-out character rigs so be prepared to build more than one rig for a character that you plan to animate extensively.
That concludes the second part of this series. We have taken a single drawing, cut it up into body parts, and constructed a hierarchically controllable rig for our cut-out character. Next time we will begin animating this bird character using key framed animation. Animating a Cut-Out Character in ToonBoom
Labels: Cut-Out Animation, Key Framed Animation, Tutorial
Building a Cut-Out Character In ToonBoom
This is the first part of a new tutorial series on creating and animating Cut-Out characters in ToonBoom Studio. Based on e-mails and comments which I have received as well as many postings on the Toon Boom User Forums, I have determined that there is a significant number of people who really want to see a detailed step by step tutorial style approach to this subject. I've written several previous tutorials on Photo Cut-Outs and Animating Cut-Outs and I hope that the lessons I have learned from doing that will help these next tutorials to be even better and more comprehensive.
NOTE: Thanks for all the comments and feedback and questions, they help me to better understand what works and what to improve in my communicating and presentation. So keep up your end too, and keep asking questions and making comments.
Just prior to this tutorial series, my most recent tutorial on Keyframing the Bouncing Ball was intended to isolate and simplify a complex subject. I hope that it has been helpful. One of the tools I introduced in that tutorial was the use of embedded slide show style step by step instructions. I'm expanding on that concept in this series. The slide shows serve two important needs. First they allow the presentation of significant amounts of information in a small footprint on the web page and secondly they allow the reader to move back and forth easily through complicated detailed instructional steps.
This series will follow the steps of constructing a cut-out character, rigging that character and animating that character. It will lay down, hopefully, a solid foundation for even more detailed tutorials expanding further into this subject. So let's begin a somewhat ambitious journey together. It all starts with a single drawing. 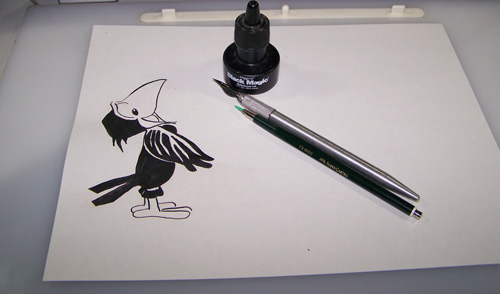 Fig. 1 A black bird character done with pen and ink
Above is a photo of the drawing on my drawing table. Yes, an actual hand drawn, old school, piece of cartoon art work. Does your cut-out character have to be drawn this way? No, you could draw it on your computer in some graphics software or even inside ToonBoom Studio itself. I wanted to do it this way for the instructional value so that we can explore the steps from scanning in a drawing to animating the character on that drawing.
I was looking at this drawing in my studio, it is part of a character design study on which I have been working. And while looking at it day after day for a period of time I realized it would really be fun to animate this black bird. So I scanned it into Photoshop and saved it as a GIF formatted image. I did absolutely no editing of the scan other than scanning it in at 300 DPI resolution. So you don't need Photoshop or any special software just draw your character and scan it into your computer to get it into an image file. (GIF, JPG, PNG etc.) I'm providing this image HERE as a download for you to use to follow this tutorial. By the way, read the tutorial and then re-read it and actually do it yourself. The only way to learn to animate in TBS is through doing it. And when you run into a problem and need help I'm here to respond to your questions on the ToonBoom User Forums or you can e-mail me directly or through the discussions area in the Cartooning in ToonBoom WIKI.
Let's get going with the first slide show. Use the Previous and Next arrows to navigate through the slides. They are packed with information so take your time and backtrack as often as you need.
If you navigated through the first slide show, you now have the bird character imported into your TBS project on a drawing element named "Scanned Image". The next slide show will take you through the steps to outline the character using the contour tool in drawing view. NOTE: If you prepared your drawn image in Photoshop with a totally transparent background and saved it as a PNG, you would not need to do the contour tool outlining steps. But I wanted to do the bulk of the work on this in TBS so I didn't do any special prep in Photoshop on purpose.If you read completely through that last slide show then you now have your character outlined using the contour tool and even scaled down to fit within your 12 field grid. Next we are going to make a duplicate of our character cell and begin the process of cutting out body parts and placing them into individual elements. The basic rule of cut-out design is "any part, that you want to be able to animate separately from any other part, must be placed on its own unique element."
If you have stuck with me this far, then you have taken your character drawing and imported it into TBS. You have outlined the character image with the contour tool and scaled the outlined character down in drawing view. Then you duplicated the cell that contained the outlined character so that you could cut parts out of that duplicate cell. You have cut out the head, right wing, right leg, the tail and the body of the bird and placed each part on to a separate element. And then using the first cell of Scanned Image as a layout guide you have used the drawing select tool to re-position the cut-out body parts over your uncut outlined light gray character.
Note: One important tip in building a cut-out character is to have the character layout as close to identical in both drawing view and camera view. For this reason, be careful to avoid using the scene select tool (6) in the building process. Do all of your drawing object transformations (scaling/re-locations etc.) using the drawing select tool (1) even in camera view. That way when you finish building your character it will look the same in both views and more importantly it will be much easier to work with when you start using the character for animating. More on this later.
That's quite a bit. Next time we will create and add a few more body parts to the character and then build a hierarchical rig that will allow us to easily animate our cut-out character. Part 2 Rigging a Cut-Out Character in ToonBoom
Labels: Cut-Out Animation, Key Framed Animation, Tutorial

