Animating Cut-Out Characters - Part 2
In our last tutorial / article, Animating Cut-Out Characters - Part 1 , we learned how to copy a library template into our project and how to manipulate the character's arm to begin to pose the Little Boy. If you missed reading that article, now would be a good time to stop and do so.
For Part 2 in our series we are going to use the Toon Boom Studio supplied cut-out character Der Der. The Der Der cut-out was created and rigged in version 3.0 of TBS and there are some differences between its rig's appearance and usage and that of the Little Boy character. The major difference is that prior to version 3.5 there were no pegs integrated into drawing or image elements. Therefore each body part element was required to be attached to a parent peg element for keyframing. Later style rigs that take advantage of the integrated pegs are easier to use because you don't have as many tracks in the timeline, but also as we progress through this tutorial, I will point out other considerations.
We need to create a new project in TBS and set our animation properties for 24 FPS. I always try to animate at 24 FPS because it is an industry standard for timing and it is best to learn to time your animation work at a consistent frame rate.
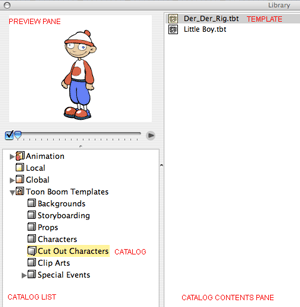
We open the library and in the catalog list we go to the TOON BOOM TEMPLATES catalog and then to the CUT OUT CHARACTERS sub-catalog where we will find the DER DER RIG template. As we did in Part 1, we want to click and drag the template from the library to our SCENE 1 timeline. The template will be fully expanded when we copy in the template. Our first task will be to prepare the template for animating. So we need to collapse the character's master peg DER_DER_rig.
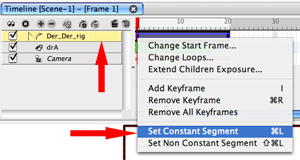
The Der Der character was created as an example of how to construct a cut-out character and the template has a number of features set up that we want to change because they are not the way we want to get started in animating this character. The first thing we will do is to go to frame 1 of the collapsed master peg and right click to open the context menu where we will select the SET CONSTANT SEGMENT option. We don't want tweens created yet while we are keyframing. Also if you don't have CREATE CONSTANT KEYFRAMES set up in your PREFERENCES do that now also. (explained in Part 1). Also go to your TOOLS menu and select the TURN PEG ONLY MODE ON option. Because we are doing pose to pose keyframing you do not want Snap Last Keyframe to be selected. (revised for V4.5) By now it should also go without saying that because we are key frame animating, you need to be in CAMERA (compositing) view.
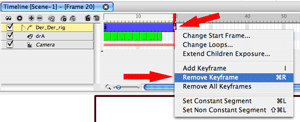
Now we need to move the red frame slider to the last frame of our master peg, frame 20, and we will again right click to open the context menu and this time we select the REMOVE KEYFRAME option. Then we want to expand the master peg to see all the tracks in the timeline.
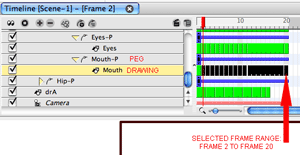
In this particular rig there are four drawing elements that have multiple cells set up for replacement animating. Left_pupil, Right_pupil, Eyes, and Mouth are those multi-cell elements. We want to set them all to just a single cell. So to do that we will adjust each of them one element at a time. Let's start with the mouth drawing element. by selecting all the frames from frame 2 to frame 20.
IMPORTANT NOTE: pegs are blue, drawing elements are green and pegs end with a -P identifier in their track name. As you will see shortly, great care needs to be observed to pay attention to which elements are pegs and which ones are drawing elements. We keyframe on pegs and we do replacement animation on drawing elements. (this is one of those old style rig VS new style rig considerations).
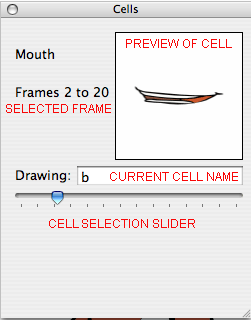
With the frames from 2 to 20 selected in the timeline for the mouth element, we look in the CELLS panel and see the current cell for frame 2 which is Mouth-b. Notice that the range of selected frames is showing as 2 thru 20. Even though there are other cells in some of those frames the CELLS panel displays only the first of the frame range's cell names.
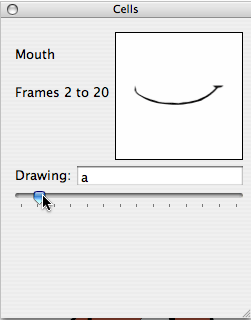
Frame 1 has Mouth-a as its exposed cell, so we want to set the frames from 2 - 20 to also have Mouth-a for their exposed cell. We can type in the letter "a" in this case for the drawing or we can just move the cell swap selection slider until Mouth-a is the current selected cell.
We will repeat this process for the other multi-cell elements, Left_pupil, Right_pupil, and Eyes. Our goal is to have all of our drawing elements be the same element cell for all 20 frame exposures in our character rig.
You may have noticed that in my project's timeline there is an additional element named drA. As I said in Part 1 you still will often want to do some rough hand drawn animating as part of doing cut-out animating, particularly for the key poses. So I have a rough walk cycle with just the main key poses timed out in drA which we will use as a posing reference. You don't have to have this kind of reference but it helps.
Download drA as a compatible template for either Version 3.5 or Version 4.0. Open your library panel and import the downloaded template to your Global library using the context menu by right clicking in the catalog content pane and selecting IMPORT>IMPORT TEMPLATE FILE. Then you can drag a copy of the drA template to your project's timeline.
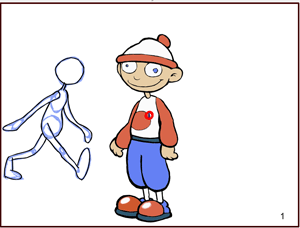
Looking in CAMERA view we see our character Der Der is not facing the same direction as our first pose in frame 1 nor is he the right scale size.
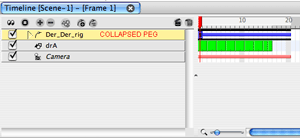
We will select the scene ops SELECT tool (6) and select the Der_Der_rig master peg in the timeline. Then we will look in the PROPERTIES panel where our selected peg's properties are displayed. These are static properties.
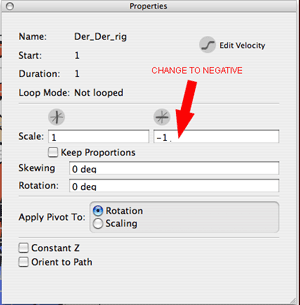
We will set the value of the second box for the Scale to negative which will flip the character horizontally. If you had set the value in the first Scale box to negative you would have flipped Der Der vertically. (This is a handy tip for changing an object's screen orientation, but be careful to remember that these are static properties and this is not how you flip characters if you wanted to do it dynamically through key framing. For that you would use the scene ops TRANSFORM tool (7) and not the PROPERTIES panel settings)
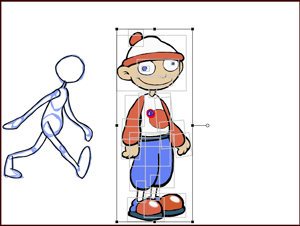
Now we have Der Der facing the correct direction but he is still too large so we need to scale him down to size. We are going to scale the entire rig and all its elements and not just for a single frame so we use the scene ops SELECT tool. We want to have the master peg Der_Der_rig selected and collapsed in the timeline. (Remember to watch for the solid bounding box handles for the SELECT tool and the hollow handles for the TRANSFORM tool ).
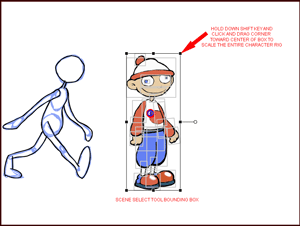
We will hold down the SHIFT key as we click and drag the upper right corner grab handle diagonally toward the center of the character to cause Der Der to get proportionally scaled smaller.
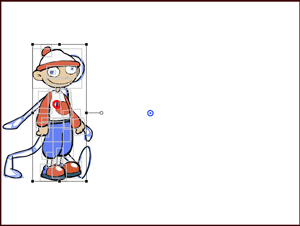
Once we finish scaling the character, we will click and drag him into position over the top of our hand drawn first pose reference where we can begin manipulating the rig to pose our character. To do that we will expand the master peg to make all of the rig's elements visible in the timeline. Then as we learned in Part 1, we will select the scene ops TRANSFORM tool (7) and use it to manipulate the character's body parts.
CAUTION: make sure that you only keyframe on the peg elements for Der Der and don't select the drawing elements by accident. If you forget and select a drawing element you will have to use UNDO to fix the mistake. Again, please note that this is an old style rig to new style rig, Version 3.0 to Version 3.5 and above consideration. Der Der's drawing elements don't have their rotational pivot points set for keyframing but because you are using V3.5 or V4.0 the drawing elements have integrated pegs and thus you can set keyframes in them which is not what you want to be doing for animating Der Der.
Be sure your red frame slider is positioned at frame 1. Which body part you choose to manipulate first is a personal choice. I typically start with the legs and work my way up to the arms. As we discussed in Part 1, you can move parts and then move other parts and just keep adjusting the pose until you are satisfied it is pretty much the way you want it. It doesn't have to be totally perfect as you can always come back later and adjust it as we will see in Part 3. When you finish manipulating Der Der into the first pose, collapse the master peg and with the scene ops TRANSFORM tool still selected use the keyboard short cut key " I " to set a keyframe. This locks down that pose for all elements in the rig from top to bottom.
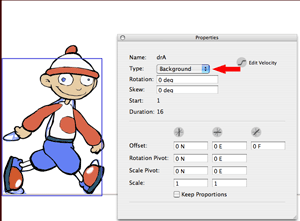
Here is a great tip for using a reference drawing for setting poses for a cut-out character. In the properties panel for the drA element I have the element TYPE set to "background" which means that the element is visually behind all the "normal" type elements in Der Der's rig.
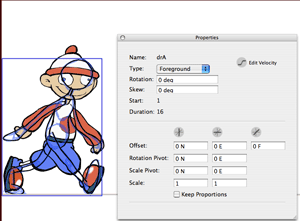
But to help see the reference more clearly while working you can go to the PROPERTIES panel and switch the drA element's TYPE to "foreground" which will pop it on top of Der Der. You can then switch the drA element's TYPE back and forth between "foreground" and "background" as you work to see it better or get it out of your way as needed.
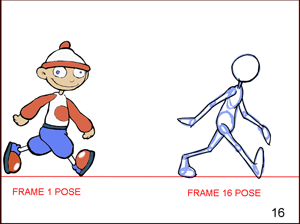
With our frame 1 pose finished we are ready to do a second pose. We are going to animate Der Der using the pose to pose technique. When animating a walk cycle I do the contact poses first. So our second pose is at frame 16 and is the repeat of the first pose except that it is in a different location on the screen. Before we can create this pose we need to add a parent peg to the Der Der character for the purpose of animating his forward motion. We want to separate the forward motion from the actual walk cycle motion so that we can reuse the walk cycle itself later in other scenes or projects.
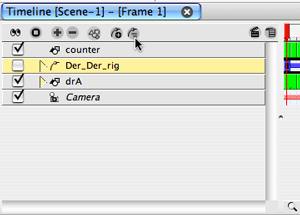
We will collapse the master peg for the Der Der character and select it in the timeline. We then click on the icon for adding a parent peg. (see the photo above)
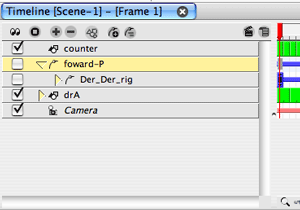
Once the new parent peg is added to the Der Der character we want to rename it to forward-P. We will only be keyframing Der Der's forward motion on this peg while all his walking motions will be keyframes on his character rig pegs. So with the forward-P peg expanded and selected and the Der_Der_rig peg collapsed, but visible, we will select the scene ops MOTION tool (0) and move the red frame slider to frame 1 and press the keyboard short cut key " I " to set a motion keyframe. Then we move the red frame slider to frame 16 and set a second motion keyframe.
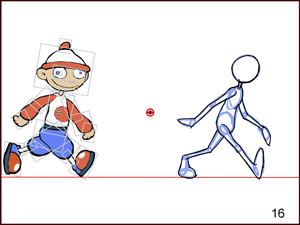
At frame 16 we see the position of our second pose. We still have the forward-P peg selected and the MOTION tool is still selected. We click and drag the Der Der character while holding down the SHIFT key to constrain his up and down position until the character is on top of our reference pose. You could also have used SHIFT plus the RIGHT ARROW key to make this move.
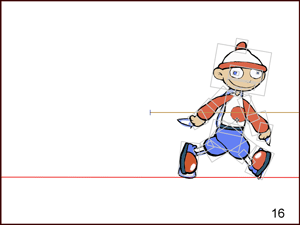
When you have the pose lined up over the reference pose, select the collapsed Der_Der_rig peg, and select the TRANSFORM tool (7) and using the context menu or the keyboard short cut key " I " set a keyframe at frame 16 to lock down the pose. Don't forget to do this because if you do forget and start changing keyframes down stream on any previous frame, they will effect frame 16's pose.
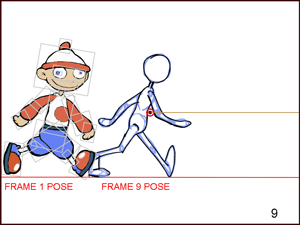
We are ready to do the middle contact pose for our walk cycle which is on frame 9. So we select the MOTION tool (0) and we select the forward-P peg and move the red frame slider to frame 9 and using the context menu or the keyboard short cut key " I " set a new motion keyframe at frame 9. Then we use the SHIFT key and click and drag the character into position over our reference pose.
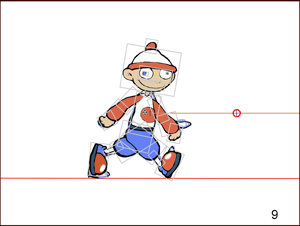
The character's pose is not correct for the middle contact position so we need to re-pose Der Der to match the reference pose.
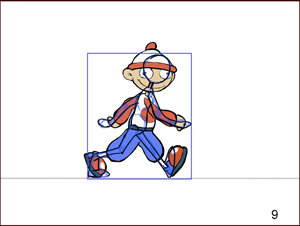
We do this exactly like we did for the first pose using the TRANSFORM tool to adjust the body parts for Der Der. Remember to be careful and only keyframe on the peg elements and not on the drawing elements of Der Der's rig.
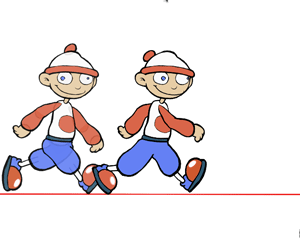
So at this point if we turn on ONION SKINNING we can see the first two poses which are opposite contact poses. And we can also see the second and third pose which are also opposite contact poses.
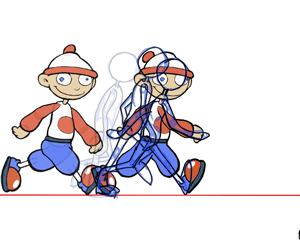
Our next steps will be to create the three poses between frame 1 and frame 9 as seen by our reference drawings above.
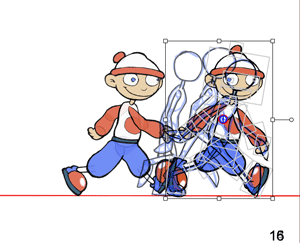
And we also need to create the three poses between frame 9 and frame 16. So that's where we will pick up in Animating Cut-Out Characters - Part 3. We will also then begin doing the additional in between poses to smooth out our character's walk.
For Part 2 in our series we are going to use the Toon Boom Studio supplied cut-out character Der Der. The Der Der cut-out was created and rigged in version 3.0 of TBS and there are some differences between its rig's appearance and usage and that of the Little Boy character. The major difference is that prior to version 3.5 there were no pegs integrated into drawing or image elements. Therefore each body part element was required to be attached to a parent peg element for keyframing. Later style rigs that take advantage of the integrated pegs are easier to use because you don't have as many tracks in the timeline, but also as we progress through this tutorial, I will point out other considerations.

We need to create a new project in TBS and set our animation properties for 24 FPS. I always try to animate at 24 FPS because it is an industry standard for timing and it is best to learn to time your animation work at a consistent frame rate.
We open the library and in the catalog list we go to the TOON BOOM TEMPLATES catalog and then to the CUT OUT CHARACTERS sub-catalog where we will find the DER DER RIG template. As we did in Part 1, we want to click and drag the template from the library to our SCENE 1 timeline. The template will be fully expanded when we copy in the template. Our first task will be to prepare the template for animating. So we need to collapse the character's master peg DER_DER_rig.

The Der Der character was created as an example of how to construct a cut-out character and the template has a number of features set up that we want to change because they are not the way we want to get started in animating this character. The first thing we will do is to go to frame 1 of the collapsed master peg and right click to open the context menu where we will select the SET CONSTANT SEGMENT option. We don't want tweens created yet while we are keyframing. Also if you don't have CREATE CONSTANT KEYFRAMES set up in your PREFERENCES do that now also. (explained in Part 1). Also go to your TOOLS menu and select the TURN PEG ONLY MODE ON option. Because we are doing pose to pose keyframing you do not want Snap Last Keyframe to be selected. (revised for V4.5) By now it should also go without saying that because we are key frame animating, you need to be in CAMERA (compositing) view.

Now we need to move the red frame slider to the last frame of our master peg, frame 20, and we will again right click to open the context menu and this time we select the REMOVE KEYFRAME option. Then we want to expand the master peg to see all the tracks in the timeline.

In this particular rig there are four drawing elements that have multiple cells set up for replacement animating. Left_pupil, Right_pupil, Eyes, and Mouth are those multi-cell elements. We want to set them all to just a single cell. So to do that we will adjust each of them one element at a time. Let's start with the mouth drawing element. by selecting all the frames from frame 2 to frame 20.
IMPORTANT NOTE: pegs are blue, drawing elements are green and pegs end with a -P identifier in their track name. As you will see shortly, great care needs to be observed to pay attention to which elements are pegs and which ones are drawing elements. We keyframe on pegs and we do replacement animation on drawing elements. (this is one of those old style rig VS new style rig considerations).

With the frames from 2 to 20 selected in the timeline for the mouth element, we look in the CELLS panel and see the current cell for frame 2 which is Mouth-b. Notice that the range of selected frames is showing as 2 thru 20. Even though there are other cells in some of those frames the CELLS panel displays only the first of the frame range's cell names.

Frame 1 has Mouth-a as its exposed cell, so we want to set the frames from 2 - 20 to also have Mouth-a for their exposed cell. We can type in the letter "a" in this case for the drawing or we can just move the cell swap selection slider until Mouth-a is the current selected cell.
We will repeat this process for the other multi-cell elements, Left_pupil, Right_pupil, and Eyes. Our goal is to have all of our drawing elements be the same element cell for all 20 frame exposures in our character rig.
You may have noticed that in my project's timeline there is an additional element named drA. As I said in Part 1 you still will often want to do some rough hand drawn animating as part of doing cut-out animating, particularly for the key poses. So I have a rough walk cycle with just the main key poses timed out in drA which we will use as a posing reference. You don't have to have this kind of reference but it helps.
Download drA as a compatible template for either Version 3.5 or Version 4.0. Open your library panel and import the downloaded template to your Global library using the context menu by right clicking in the catalog content pane and selecting IMPORT>IMPORT TEMPLATE FILE. Then you can drag a copy of the drA template to your project's timeline.

Looking in CAMERA view we see our character Der Der is not facing the same direction as our first pose in frame 1 nor is he the right scale size.

We will select the scene ops SELECT tool (6) and select the Der_Der_rig master peg in the timeline. Then we will look in the PROPERTIES panel where our selected peg's properties are displayed. These are static properties.

We will set the value of the second box for the Scale to negative which will flip the character horizontally. If you had set the value in the first Scale box to negative you would have flipped Der Der vertically. (This is a handy tip for changing an object's screen orientation, but be careful to remember that these are static properties and this is not how you flip characters if you wanted to do it dynamically through key framing. For that you would use the scene ops TRANSFORM tool (7) and not the PROPERTIES panel settings)

Now we have Der Der facing the correct direction but he is still too large so we need to scale him down to size. We are going to scale the entire rig and all its elements and not just for a single frame so we use the scene ops SELECT tool. We want to have the master peg Der_Der_rig selected and collapsed in the timeline. (Remember to watch for the solid bounding box handles for the SELECT tool and the hollow handles for the TRANSFORM tool ).

We will hold down the SHIFT key as we click and drag the upper right corner grab handle diagonally toward the center of the character to cause Der Der to get proportionally scaled smaller.

Once we finish scaling the character, we will click and drag him into position over the top of our hand drawn first pose reference where we can begin manipulating the rig to pose our character. To do that we will expand the master peg to make all of the rig's elements visible in the timeline. Then as we learned in Part 1, we will select the scene ops TRANSFORM tool (7) and use it to manipulate the character's body parts.
CAUTION: make sure that you only keyframe on the peg elements for Der Der and don't select the drawing elements by accident. If you forget and select a drawing element you will have to use UNDO to fix the mistake. Again, please note that this is an old style rig to new style rig, Version 3.0 to Version 3.5 and above consideration. Der Der's drawing elements don't have their rotational pivot points set for keyframing but because you are using V3.5 or V4.0 the drawing elements have integrated pegs and thus you can set keyframes in them which is not what you want to be doing for animating Der Der.
Be sure your red frame slider is positioned at frame 1. Which body part you choose to manipulate first is a personal choice. I typically start with the legs and work my way up to the arms. As we discussed in Part 1, you can move parts and then move other parts and just keep adjusting the pose until you are satisfied it is pretty much the way you want it. It doesn't have to be totally perfect as you can always come back later and adjust it as we will see in Part 3. When you finish manipulating Der Der into the first pose, collapse the master peg and with the scene ops TRANSFORM tool still selected use the keyboard short cut key " I " to set a keyframe. This locks down that pose for all elements in the rig from top to bottom.

Here is a great tip for using a reference drawing for setting poses for a cut-out character. In the properties panel for the drA element I have the element TYPE set to "background" which means that the element is visually behind all the "normal" type elements in Der Der's rig.

But to help see the reference more clearly while working you can go to the PROPERTIES panel and switch the drA element's TYPE to "foreground" which will pop it on top of Der Der. You can then switch the drA element's TYPE back and forth between "foreground" and "background" as you work to see it better or get it out of your way as needed.

With our frame 1 pose finished we are ready to do a second pose. We are going to animate Der Der using the pose to pose technique. When animating a walk cycle I do the contact poses first. So our second pose is at frame 16 and is the repeat of the first pose except that it is in a different location on the screen. Before we can create this pose we need to add a parent peg to the Der Der character for the purpose of animating his forward motion. We want to separate the forward motion from the actual walk cycle motion so that we can reuse the walk cycle itself later in other scenes or projects.

We will collapse the master peg for the Der Der character and select it in the timeline. We then click on the icon for adding a parent peg. (see the photo above)

Once the new parent peg is added to the Der Der character we want to rename it to forward-P. We will only be keyframing Der Der's forward motion on this peg while all his walking motions will be keyframes on his character rig pegs. So with the forward-P peg expanded and selected and the Der_Der_rig peg collapsed, but visible, we will select the scene ops MOTION tool (0) and move the red frame slider to frame 1 and press the keyboard short cut key " I " to set a motion keyframe. Then we move the red frame slider to frame 16 and set a second motion keyframe.

At frame 16 we see the position of our second pose. We still have the forward-P peg selected and the MOTION tool is still selected. We click and drag the Der Der character while holding down the SHIFT key to constrain his up and down position until the character is on top of our reference pose. You could also have used SHIFT plus the RIGHT ARROW key to make this move.

When you have the pose lined up over the reference pose, select the collapsed Der_Der_rig peg, and select the TRANSFORM tool (7) and using the context menu or the keyboard short cut key " I " set a keyframe at frame 16 to lock down the pose. Don't forget to do this because if you do forget and start changing keyframes down stream on any previous frame, they will effect frame 16's pose.

We are ready to do the middle contact pose for our walk cycle which is on frame 9. So we select the MOTION tool (0) and we select the forward-P peg and move the red frame slider to frame 9 and using the context menu or the keyboard short cut key " I " set a new motion keyframe at frame 9. Then we use the SHIFT key and click and drag the character into position over our reference pose.

The character's pose is not correct for the middle contact position so we need to re-pose Der Der to match the reference pose.

We do this exactly like we did for the first pose using the TRANSFORM tool to adjust the body parts for Der Der. Remember to be careful and only keyframe on the peg elements and not on the drawing elements of Der Der's rig.

So at this point if we turn on ONION SKINNING we can see the first two poses which are opposite contact poses. And we can also see the second and third pose which are also opposite contact poses.

Our next steps will be to create the three poses between frame 1 and frame 9 as seen by our reference drawings above.

And we also need to create the three poses between frame 9 and frame 16. So that's where we will pick up in Animating Cut-Out Characters - Part 3. We will also then begin doing the additional in between poses to smooth out our character's walk.
Labels: Cut-Out Animation, Key Framed Animation, Tutorial

