Key Framed Animation Part 5
Please be sure to review
also review the demonstration scene .
In Part 3 we constructed the underwater environment for our demonstration scene. In Part 4 we created the swimming cycle for our fish and we animated his swimming into the scene using a motion guide. The storyline calls for Filbert, the fish, to tread water briefly after he reaches mid-scene before he reacts to seeing the shark. To accentuate the surprise factor of this scene we have determined in the storyboards that animating the camera is appropriate at this time. In a cinematic scene we may stay within a common setting but the use of multiple shots or view points is useful in adding to the storytelling. We are going to move in close on Filbert before he reacts and then after his reaction fills the screen, we will “hard cut” back to a reveal shot of the source of his panic.
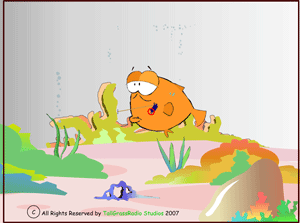
In order to animate the camera we need to attach the camera element to a peg element, the easiest way to do that is to use the “add parent peg” icon at the top of the timeline track label list while we have the camera element’s track selected. Once the camera is attached to a parent peg, which is named Camera-P a standard naming convention for a single element parent peg, we need to go to frame 1 of Camera -P and make the transform tool active and set our initializing keyframe. This is to lock down our starting characteristics for the camera. It is always a good practice to set a transform group of keyframes on the first frame of any peg to initialize the peg. This is true for separate peg elements or integrated pegs on image or drawing elements. Next we will move to frame 671 on the Camera-P peg and add a second key frame being sure the transform tool is still active. Again prior to starting a camera move it is advised to lock down the end of any previous shot. We will start out trucking in shot on frame 672. We need to make the motion tool active and set a motion keyframe. The camera’s point of view at frame 672 is the beginning of our trucking shot.
(click on to enlarge)
Next we need to move to the ending frame of the shot at frame 710. With the motion tool still active we need to set a key frame. Now we can execute the shot by selecting the end of the motion path at frame 710 and dragging it to position our camera view point to the ending view of this shot. I usually do this in Top view first while visually watching the view point change in Camera view. I may, and usually do, make additional adjustments by dragging the end of the motion guide in the Side view as well.

Now that I have "trucked in" to the ending position of this shot, I need to go back to frame 672, the beginning position and on the Camera-P peg, I want to set the segment between frames 672’s motion key and frame 710’s motion key to be a non-constant segment. I set my TBS preferences to always create constant segments on my pegs as I prefer to set my non-constant segments manually when needed. Be sure you still have the motion tool active when setting this segment to tell TBS you are setting a motion key segment. The solid line between the motion keyframes indicates the segment is now a non-constant segment.
(click on to enlarge)
Below you can see the motion paths with their corresponding spacing indicated in both the Side and Top view panels. I left the velocity function as the default even spacing because this is a really short duration move and it works well that way. Had it been a longer move I probably would have used an ease-in ease-out velocity function.
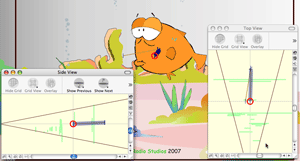
(click on to enlarge)
Filbert's screaming reaction starts at frame 723. I animated this similarly to the way I animated his swimming cycle in drawing view by drawing the various cells to create the scream. So now I just need to insert that element and these cells into the timeline starting with frame 723. I need to be sure to have the select tool active before I start trying to position this Filbert screaming element. The hardest part of keyframe animation is making sure you always have the best tool selected for what you are trying to do. You have to be paying attention to your active tool or you can make inadvertent mistakes really easily.

The shark is also animated as an element in drawing view and I have placed his swimming cycle into the time line but he is currently off camera because we are still "trucked" in tight on Filbert.
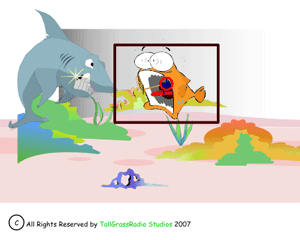
At frame 770 on the Camera-P peg I want to set a new motion key, so I have to make the motion tool active. I add a keyframe and reposition the camera’s view point to the "reveal" of the shark. I want this camera shot to be a “hard cut” so I will leave the segment between frame 710’s motion key and frame 770’s motion key as a constant segment.

(click on to enlarge)
This causes the shot to “snap” from the "trucked in" close up to the reveal shot when the movie reaches frame 770
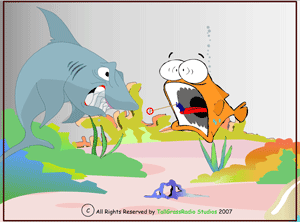
Now it is time to have Filbert make a strategic retreat. Actually he is going to “zip” out of there for his life!! Things will happen so fast that I can save myself a lot of work by just reusing the same swim cycle I used earlier in the scene. I made it a template, so reusing it is just a matter or dragging and dropping it from my library to the timeline.
It is just one 12 frame cycle. Now you might be wondering why I used a second instance of the swimming template rather than adding to the time line of the first instance I used at the beginning of the scene. That instance has static values I applied to it to position and flip the fish. If I just advance the timeline for that instance and repositioned Filbert with the scene planning select tool so that he was facing the opposite direction it would be a global change and mess up the first bit of animation I made. It is just cleaner and easier to reuse the template as a new series of tracks just for this short “zip” off.
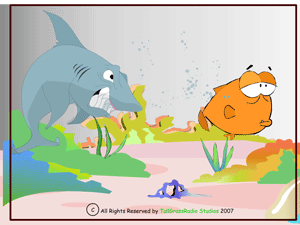
So, I place Filbert swimming into the scene starting at frame 795. I use the select tool to scale him to 50% but I don’t need to flip him horizontally this time. Using the transform tool I put a starting and ending keyframe on his main character peg just for good measure and I selected the 12 frames with the main character peg collapsed and copied them. I moved to the end of the cycle and pasted them using “paste special” to extend the exposure of the first cycle to a second cycle. This second cycle will totally never be seen but I wanted the extra frames to help with my “zip” motion. Now I will attach the second instance of Filbert swimming to a peg element which I added and named “Zipaway”. This is going to be my motion guide. I collapse the Zipaway peg and make the motion tool active and go to frame 795 on the Zipaway peg and set a motion key. I then move to frame 819 on the Zipaway peg and set a second motion key. I move the motion guide's end to position Filbert off screen using the Top view and Side view to get the desired location. Then I return to frame 795 on the Zipaway peg and with the motion tool active, set the segment between these two motion keys to be a non-constant segment.

(click on to enlarge)
I want the spacing for this "zip" action to be different from the default even spacing, so I need to create a different velocity curve from the default linear velocity curve.
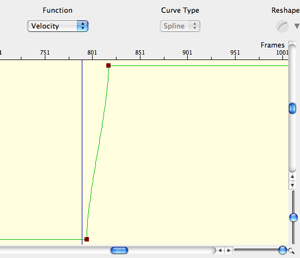
With the “Zipaway” peg selected in the timeline, I open the function editor; I have the function editor set up as keyboard short cut key “J” which makes opening and closing the panel really convenient. I first need to select "velocity" as my function because this is a motion segment. If it had been a scale segment I would have chosen H-scale or V-scale, for a rotation segment I would have chosen Rotation, and for a skew segment I would have chosen Skewing. They are all used to set the spacing for the “tweening” just for different attribute types. I zoom in on my frames for this segment and using the "reshape" pull down at the top right corner of the function editor window, I chose a fast out/in curve shape. I’m not interested in the end of the motion’s spacing because it will be off camera, but the beginning spacing is important to getting the desired action. I want the in betweens to be farther apart as the beginning to add speed to the action.
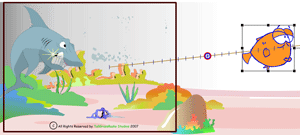
(click on to enlarge)
I added a special effect with bubbles in element " Bubbles 3" to give the "zip" an extra impact as Filbert is really stirring up the water as he makes for cover. That’s pretty much it for this scene. I certainly hope that this series on Key Framed Animation has given you a sound foundation on keyframing and how to use this technique in animating. There are plenty of additional aspects to key framed animation but those are for future articles.
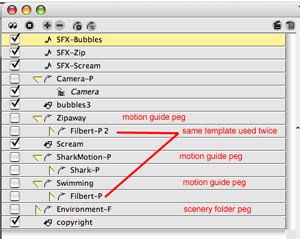
Above is a view of the track label list with pegs mostly collapsed but I wanted to show you the tracks that were the same template reused twice as well as the motion guide peg elements.
Labels: Fundamentals, Key Framed Animation, Key Framing, Scene Planning Tools, Velocity Curves
