A Good Place To Start - Part 1
A recent posting on the Toon Boom Studio forums requested tutorial help for a 9 year old interested in getting started in animation. I thought back to when I was a young person and started animating and I remembered making "flip books" full of stick figures doing all sorts of actions. Today with products like Toon Boom Studio and Toon Boom Studio Express learning to animate is really fun and easy.
I decided that this first tutorial should be a good place to start in that learning process. So I'm going to take you through the steps in creating a "stick figure" throwing a ball. I'm going to keep it as simple as possible and break it into two parts just for ease in publication. I certainly hope that you will find it informative even if you are older than 9 years old.
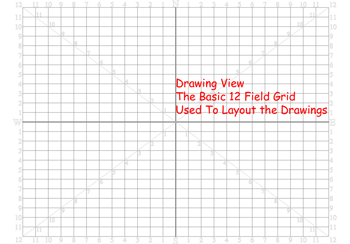
The first step in doing our "stick figure" animation is to open TBS and find the drawing view panel where we will draw our action.
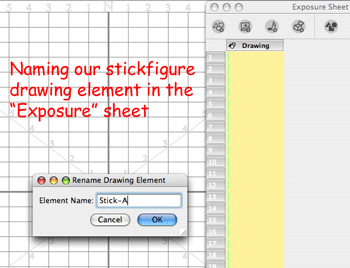
You will also want to open up your Exposure Sheet panel which has a single drawing element by default. We will start by renaming that drawing element.
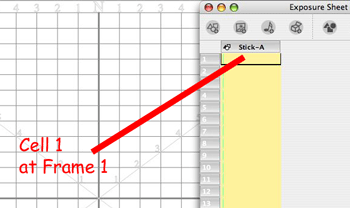
Our first sheet of "digital" paper will be cell 1 at frame 1 under the Stick-A drawing element.
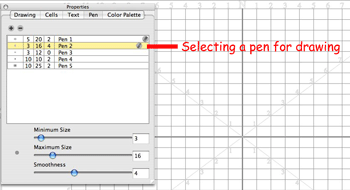
Now that we have a place to start drawing our action, we will need a drawing tool like the pencil or the brush. I normally use the brush for rough animation. We need to open the Properties panel and choose a "pen" for our drawing tool. I have set up and chosen a variable pen 3 minimum and 16 maximum and smoothing set to level 4. (strictly a personal preference) You can't take advantage of pressure sensitivity unless you are using a drawing tablet like a Wacom tablet.
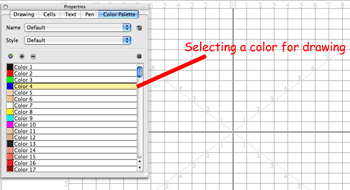
We also need to choose a color for our "stick figure" drawing, so I chose "blue". (again just a personal preference for rough sketches)
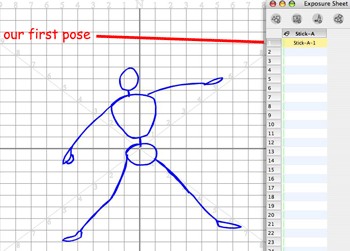
Now that we have chosen a pen and a color, we can start drawing. So I have drawn the first pose of our "stick figure" starting to throw a ball.
Be sure to save your project work often to avoid the possibility of losing it to the mysterious world of computer goblins. I saved my project to a file called "Stick", which is very original and took lots of thought. Not really. Next we want to advance to the second frame in our Exposure Sheet and extend the exposure of our first cell to include frame 2. We will do this for each drawing we make in this first pass. This is called animating on 2's where each drawing is held for 2 frames. As a side note I have the animation project set up for 24 frames per second as the frame rate. Refer to this weblog article to learn more about animation timing and frame rates.
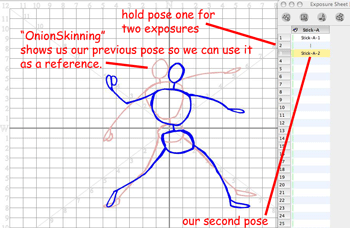
Now we want to move to frame 3 to draw our second "key" drawing in this throwing action. I have turned on onion skinning so that I can see the previous drawing and use that as a guide for this next "key" drawing. Onion skinning is like using a light box as a drawing board so you can see the drawing underneath your current drawing. If you have never seen or used a light box, then hold two sheets of drawing paper up to a lamp and you will get the idea of how us old timers use light boxes.
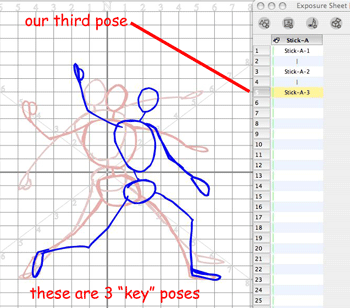
After completing pose two, we extend its exposure an additional frame and move on to frame 5 to draw our third "key" pose. For the most part this is called working "straight ahead" but in Part 2 of the tutorial we will remove the second exposures and add in between drawings to improve the smoothness of our throwing motion. So we will end up animating on 1's instead of 2's, but that is for the next part of the tutorial.
By now you should be seeing a pattern in our work flow. We draw a pose then extend its exposure for a second frame then move to the next frame and using the onion skinning we reference the previous drawing to make the next pose. One interesting thing to note about most non-mechanical motions is that things travel in arcs. So as you look at the various poses in sequence try to see if you can find the many arcs I'm using. Here's a tip. Pick almost any body part and follow that specific part from pose to pose. It will be following an arc path.
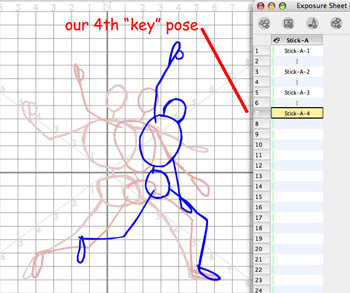
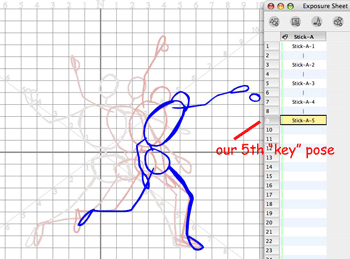
We are making good progress as this next drawing is our 5th "key" pose. You don't need to be a great artist to animate. Sure the more you draw the better your skills will evolve, but stick figures are fun and easy to animate and are the basis of animating almost any cartoon character. You just need to add some flesh and muscles to those "sticks".
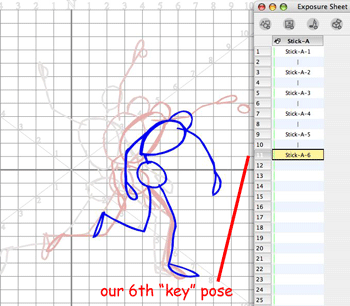
We are almost through doing our "key" pose drawings for this throwing action. Here is "key" pose number 6.
And finally here is the 7th and final "key" pose. If you want you can stop right here and have a pretty nice first animated throwing action.
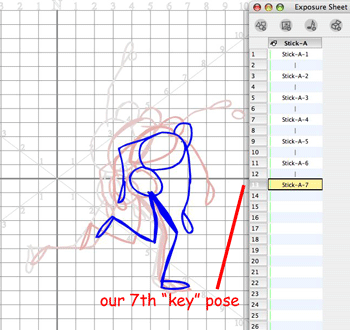
In Part 2 we will go back and add in between drawings to give this action a more fluid look.
I decided that this first tutorial should be a good place to start in that learning process. So I'm going to take you through the steps in creating a "stick figure" throwing a ball. I'm going to keep it as simple as possible and break it into two parts just for ease in publication. I certainly hope that you will find it informative even if you are older than 9 years old.
The first step in doing our "stick figure" animation is to open TBS and find the drawing view panel where we will draw our action.
You will also want to open up your Exposure Sheet panel which has a single drawing element by default. We will start by renaming that drawing element.
Our first sheet of "digital" paper will be cell 1 at frame 1 under the Stick-A drawing element.
Now that we have a place to start drawing our action, we will need a drawing tool like the pencil or the brush. I normally use the brush for rough animation. We need to open the Properties panel and choose a "pen" for our drawing tool. I have set up and chosen a variable pen 3 minimum and 16 maximum and smoothing set to level 4. (strictly a personal preference) You can't take advantage of pressure sensitivity unless you are using a drawing tablet like a Wacom tablet.
We also need to choose a color for our "stick figure" drawing, so I chose "blue". (again just a personal preference for rough sketches)
Now that we have chosen a pen and a color, we can start drawing. So I have drawn the first pose of our "stick figure" starting to throw a ball.
Be sure to save your project work often to avoid the possibility of losing it to the mysterious world of computer goblins. I saved my project to a file called "Stick", which is very original and took lots of thought. Not really. Next we want to advance to the second frame in our Exposure Sheet and extend the exposure of our first cell to include frame 2. We will do this for each drawing we make in this first pass. This is called animating on 2's where each drawing is held for 2 frames. As a side note I have the animation project set up for 24 frames per second as the frame rate. Refer to this weblog article to learn more about animation timing and frame rates.
Now we want to move to frame 3 to draw our second "key" drawing in this throwing action. I have turned on onion skinning so that I can see the previous drawing and use that as a guide for this next "key" drawing. Onion skinning is like using a light box as a drawing board so you can see the drawing underneath your current drawing. If you have never seen or used a light box, then hold two sheets of drawing paper up to a lamp and you will get the idea of how us old timers use light boxes.
After completing pose two, we extend its exposure an additional frame and move on to frame 5 to draw our third "key" pose. For the most part this is called working "straight ahead" but in Part 2 of the tutorial we will remove the second exposures and add in between drawings to improve the smoothness of our throwing motion. So we will end up animating on 1's instead of 2's, but that is for the next part of the tutorial.
By now you should be seeing a pattern in our work flow. We draw a pose then extend its exposure for a second frame then move to the next frame and using the onion skinning we reference the previous drawing to make the next pose. One interesting thing to note about most non-mechanical motions is that things travel in arcs. So as you look at the various poses in sequence try to see if you can find the many arcs I'm using. Here's a tip. Pick almost any body part and follow that specific part from pose to pose. It will be following an arc path.
We are making good progress as this next drawing is our 5th "key" pose. You don't need to be a great artist to animate. Sure the more you draw the better your skills will evolve, but stick figures are fun and easy to animate and are the basis of animating almost any cartoon character. You just need to add some flesh and muscles to those "sticks".
We are almost through doing our "key" pose drawings for this throwing action. Here is "key" pose number 6.
And finally here is the 7th and final "key" pose. If you want you can stop right here and have a pretty nice first animated throwing action.
In Part 2 we will go back and add in between drawings to give this action a more fluid look.
Labels: Tutorial


6 Comments:
Thank you very much for the first part of this tutorial, it is very nice, well doine, easy to understand and ends with a nice outcome. Very well done, you should create more tutorials in the future, if you havn't already, for Toon Boom. Thanx again!
This is a wonderful blog. I am a broken-down amateur hardknocks and half-college trained character designer looking for freedom through Toon Boom Animation. I will certainly read more of your posts when I need 'Mr. Whoopee'.
Your stuff should be made into a book.
Nick Furlano
This and it's second part have been a GREAT place to start. I'm not really sure what you say caused it but something just made me kind of "get it". Reminds me of when I finally "got" playing music. Feels pretty much the same. Eternal Thanks.
Thank you.
I'm not quite brand spaking new to traditionial animation practice, I've been studying resources like, "Animator's Survival Kit," and such for years-and I'm a Media Arts student, but..for some reason I keep getting, 'stuck'. I really need to work on my tweens-not doing them, but how far to space them-I'm always moving them way too much, or when I got a smooth action going-I'll grow too impatient. Three-four years makes me feel like crap cause I should at least have made one peronsal film by now....
Thanks for your resources-and if you have any tips for someone who can, "Get going with the ideas but not execute them," tell me! Seriously, I get up to about the storyboard or gags and hit roadblocks lately, I'd love to now your process.
As this is the start of a new year, 2009, I think that it is only fitting to respond to your question by just repeating some tried and true advice that I like to fall back on personally when ever the going gets tough.
The secret to succeeding at anything is persistence. You have to be able to just keep working and trying over and over again until you reach your goal.
The difference between someone who finishes anything and someone who just wants to do something but can not get it done, is the simple act of stopping too soon.
You have to set reasonable goals, then break those goals down into a series of objectives that must be accomplished to reach your goals.
Then break those necessary objectives down into the necessary prerequisite tasks that need to be reached in order to accomplish each of your objectives.
Once you determine what your prerequisites and objectives are to reach your goal, then you can determine a plan of action.
Each step along the way may have its obstacles that must be overcome, so you must just keep at it until you succeed, constantly adjusting but never giving up.
That's the secret process to success. Set a goal, determine your objectives, break your objectives down into prerequisite tasks, make a plan, be willing to make adjustments as you proceed but most importantly never quit trying no matter what obstacles you may have to overcome.
This blog is awesome! It is breaks things down into baby steps for people new to animation.
Post a Comment
<< Home