Building a Cut-Out Character In ToonBoom
This is the first part of a new tutorial series on creating and animating Cut-Out characters in ToonBoom Studio. Based on e-mails and comments which I have received as well as many postings on the Toon Boom User Forums, I have determined that there is a significant number of people who really want to see a detailed step by step tutorial style approach to this subject. I've written several previous tutorials on Photo Cut-Outs and Animating Cut-Outs and I hope that the lessons I have learned from doing that will help these next tutorials to be even better and more comprehensive.
NOTE: Thanks for all the comments and feedback and questions, they help me to better understand what works and what to improve in my communicating and presentation. So keep up your end too, and keep asking questions and making comments.
Just prior to this tutorial series, my most recent tutorial on Keyframing the Bouncing Ball was intended to isolate and simplify a complex subject. I hope that it has been helpful. One of the tools I introduced in that tutorial was the use of embedded slide show style step by step instructions. I'm expanding on that concept in this series. The slide shows serve two important needs. First they allow the presentation of significant amounts of information in a small footprint on the web page and secondly they allow the reader to move back and forth easily through complicated detailed instructional steps.
This series will follow the steps of constructing a cut-out character, rigging that character and animating that character. It will lay down, hopefully, a solid foundation for even more detailed tutorials expanding further into this subject. So let's begin a somewhat ambitious journey together. It all starts with a single drawing.
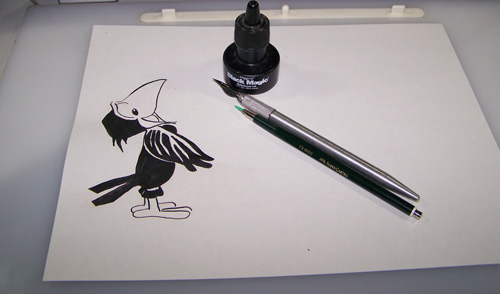
Fig. 1 A black bird character done with pen and ink
Above is a photo of the drawing on my drawing table. Yes, an actual hand drawn, old school, piece of cartoon art work. Does your cut-out character have to be drawn this way? No, you could draw it on your computer in some graphics software or even inside ToonBoom Studio itself. I wanted to do it this way for the instructional value so that we can explore the steps from scanning in a drawing to animating the character on that drawing.
I was looking at this drawing in my studio, it is part of a character design study on which I have been working. And while looking at it day after day for a period of time I realized it would really be fun to animate this black bird. So I scanned it into Photoshop and saved it as a GIF formatted image. I did absolutely no editing of the scan other than scanning it in at 300 DPI resolution. So you don't need Photoshop or any special software just draw your character and scan it into your computer to get it into an image file. (GIF, JPG, PNG etc.) I'm providing this image HERE as a download for you to use to follow this tutorial. By the way, read the tutorial and then re-read it and actually do it yourself. The only way to learn to animate in TBS is through doing it. And when you run into a problem and need help I'm here to respond to your questions on the ToonBoom User Forums or you can e-mail me directly or through the discussions area in the Cartooning in ToonBoom WIKI.
Let's get going with the first slide show. Use the Previous and Next arrows to navigate through the slides. They are packed with information so take your time and backtrack as often as you need.
If you navigated through the first slide show, you now have the bird character imported into your TBS project on a drawing element named "Scanned Image". The next slide show will take you through the steps to outline the character using the contour tool in drawing view. NOTE: If you prepared your drawn image in Photoshop with a totally transparent background and saved it as a PNG, you would not need to do the contour tool outlining steps. But I wanted to do the bulk of the work on this in TBS so I didn't do any special prep in Photoshop on purpose.
If you read completely through that last slide show then you now have your character outlined using the contour tool and even scaled down to fit within your 12 field grid. Next we are going to make a duplicate of our character cell and begin the process of cutting out body parts and placing them into individual elements. The basic rule of cut-out design is "any part, that you want to be able to animate separately from any other part, must be placed on its own unique element."
If you have stuck with me this far, then you have taken your character drawing and imported it into TBS. You have outlined the character image with the contour tool and scaled the outlined character down in drawing view. Then you duplicated the cell that contained the outlined character so that you could cut parts out of that duplicate cell. You have cut out the head, right wing, right leg, the tail and the body of the bird and placed each part on to a separate element. And then using the first cell of Scanned Image as a layout guide you have used the drawing select tool to re-position the cut-out body parts over your uncut outlined light gray character.
Note: One important tip in building a cut-out character is to have the character layout as close to identical in both drawing view and camera view. For this reason, be careful to avoid using the scene select tool (6) in the building process. Do all of your drawing object transformations (scaling/re-locations etc.) using the drawing select tool (1) even in camera view. That way when you finish building your character it will look the same in both views and more importantly it will be much easier to work with when you start using the character for animating. More on this later.
That's quite a bit. Next time we will create and add a few more body parts to the character and then build a hierarchical rig that will allow us to easily animate our cut-out character. Part 2 Rigging a Cut-Out Character in ToonBoom
NOTE: Thanks for all the comments and feedback and questions, they help me to better understand what works and what to improve in my communicating and presentation. So keep up your end too, and keep asking questions and making comments.
Just prior to this tutorial series, my most recent tutorial on Keyframing the Bouncing Ball was intended to isolate and simplify a complex subject. I hope that it has been helpful. One of the tools I introduced in that tutorial was the use of embedded slide show style step by step instructions. I'm expanding on that concept in this series. The slide shows serve two important needs. First they allow the presentation of significant amounts of information in a small footprint on the web page and secondly they allow the reader to move back and forth easily through complicated detailed instructional steps.
This series will follow the steps of constructing a cut-out character, rigging that character and animating that character. It will lay down, hopefully, a solid foundation for even more detailed tutorials expanding further into this subject. So let's begin a somewhat ambitious journey together. It all starts with a single drawing.
Fig. 1 A black bird character done with pen and ink
Above is a photo of the drawing on my drawing table. Yes, an actual hand drawn, old school, piece of cartoon art work. Does your cut-out character have to be drawn this way? No, you could draw it on your computer in some graphics software or even inside ToonBoom Studio itself. I wanted to do it this way for the instructional value so that we can explore the steps from scanning in a drawing to animating the character on that drawing.
I was looking at this drawing in my studio, it is part of a character design study on which I have been working. And while looking at it day after day for a period of time I realized it would really be fun to animate this black bird. So I scanned it into Photoshop and saved it as a GIF formatted image. I did absolutely no editing of the scan other than scanning it in at 300 DPI resolution. So you don't need Photoshop or any special software just draw your character and scan it into your computer to get it into an image file. (GIF, JPG, PNG etc.) I'm providing this image HERE as a download for you to use to follow this tutorial. By the way, read the tutorial and then re-read it and actually do it yourself. The only way to learn to animate in TBS is through doing it. And when you run into a problem and need help I'm here to respond to your questions on the ToonBoom User Forums or you can e-mail me directly or through the discussions area in the Cartooning in ToonBoom WIKI.
Let's get going with the first slide show. Use the Previous and Next arrows to navigate through the slides. They are packed with information so take your time and backtrack as often as you need.
If you navigated through the first slide show, you now have the bird character imported into your TBS project on a drawing element named "Scanned Image". The next slide show will take you through the steps to outline the character using the contour tool in drawing view. NOTE: If you prepared your drawn image in Photoshop with a totally transparent background and saved it as a PNG, you would not need to do the contour tool outlining steps. But I wanted to do the bulk of the work on this in TBS so I didn't do any special prep in Photoshop on purpose.
If you read completely through that last slide show then you now have your character outlined using the contour tool and even scaled down to fit within your 12 field grid. Next we are going to make a duplicate of our character cell and begin the process of cutting out body parts and placing them into individual elements. The basic rule of cut-out design is "any part, that you want to be able to animate separately from any other part, must be placed on its own unique element."
If you have stuck with me this far, then you have taken your character drawing and imported it into TBS. You have outlined the character image with the contour tool and scaled the outlined character down in drawing view. Then you duplicated the cell that contained the outlined character so that you could cut parts out of that duplicate cell. You have cut out the head, right wing, right leg, the tail and the body of the bird and placed each part on to a separate element. And then using the first cell of Scanned Image as a layout guide you have used the drawing select tool to re-position the cut-out body parts over your uncut outlined light gray character.
Note: One important tip in building a cut-out character is to have the character layout as close to identical in both drawing view and camera view. For this reason, be careful to avoid using the scene select tool (6) in the building process. Do all of your drawing object transformations (scaling/re-locations etc.) using the drawing select tool (1) even in camera view. That way when you finish building your character it will look the same in both views and more importantly it will be much easier to work with when you start using the character for animating. More on this later.
That's quite a bit. Next time we will create and add a few more body parts to the character and then build a hierarchical rig that will allow us to easily animate our cut-out character. Part 2 Rigging a Cut-Out Character in ToonBoom
Labels: Cut-Out Animation, Key Framed Animation, Tutorial


13 Comments:
I am very interested in your tutorial, however I am unable to see the slideshows. Have others had this problem. Thanks.
The slide shows are just standard SWF formatted files. So you just need the Adobe Flash reader plug-in for your browser. It could be as simple as your needing to change a browser setting if you are using Internet Explorer or you may need to upgrade or change your browser to something like Firefox. In either case if you can't view SWF files over the Internet you are really missing a lot of great stuff.
great tuts, but i get stuck on this page when I control-click to add vector points. I am using a mac. when i do command click, i get a lasso indicator, and can't add a vector point. Control-click does nothing. I am using V4, and am in Snow Leopard. Perhaps it's not supported here...but I really want to learn this tool. Thx.
I tried the demo for the PC in VMWare Fusion on the same machine, and I get the same results...arg.
Figured out the contour tool problem, the wacom mouse is inop, but the pen tool works great, the key combos are all different in leopard then in this tut, but got that figured. my next question is this:
This is too tedious! there must be a faster way to outline scanned work no? I have to do this dozens if not hundreds of sketches? oh boy, where's the the gangha...
But i am going to suffer through this one way or another, I am now wondering if there is anyone listening...
If you only have a small number of images to process then this technique works fine for outlining. If you have a large number of images or just prefer, then take your images into a program like Photoshop and use a tool like the magic eraser or background eraser to eliminate unwanted material and then save the image as a PNG with a transparent background. Then when you import and vectorize with texture you shouldn't need to do anything except cut out and rig if required.
how do you colour your character once it has been vectorized all i get is a black and white pallete
The pallete which you are describing is imported along with the image and therefore only contains the colors of that image. If you want to use different colors just switch to a different color pallete or add your own color swatches to the imported color palette.
Great tutorial.
I'm just having trouble with adding vector points. I'm using V4.5. When I press CTRL and click nothing happens, when I press Shift and click a vector appears but disappears when I click again!
Any help would be greatly appreciated. Thanks!
CTRL +Click is the command for a Windows PC, But if you are using a Mac the command is ALT+Click. I hope that helps you.
It worked! Thanks very much!
It's been a few years since the last comment, but I'll bring it back and hope for a response!
So, it's the process the same if I draw my character in Toon Boom?
Yes the process is the same although the initial steps described would not be exactly the same obviously because of the way you will be approaching the character design. If you still have questions please ask them here and I will try to assist you.
Post a Comment
<< Home