Keyframing The Bouncing Ball
In this tutorial, I am going to guide you through a step by step approach to creating a classical animation exercise, the bouncing ball, using the keyframe animation tools of Toon Boom Studio. Even if you're not really excited about creating this basic animation practice exercise, I hope you will find this tutorial very informative in that it uses a relatively simple animated action to demonstrate the very important and often misunderstood techniques of using keyframes and "tweening" without ending up with an action that looks like it was done by the software and not animated by a person. In other words I'm going to show you how to use "tweening" as a helpful step in the process and not have your work end up looking "tweeny".
If you are unfamiliar with the basics of key framed animation in Toon Boom Studio, before you continue here, I highly recommend that you take the time to read the 5 part series I previously wrote starting with Key Framed Animation Part 1 .
The tutorial will unfold as follow:
1. Creation of assets (cells) for a ball, a ground line, and a reference guide.
2. Switch to "camera view" and begin setting primary keys for the action.
3. Pass 1 refinements of inbetween frames converting some tweens to keys.
4. Pass 2 refinements of inbetween frames converting remaining tweens to keys.
5. Revising the spacing of the keys to improve the action.
6. Adding in squash and stretch to improve the action.
7. The final results.
(fig. 1: Cell da-1)
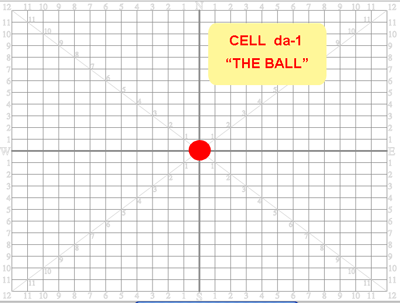
We are going to start our bouncing ball animation by first creating a drawing element and creating one cell drawing in that element. We will name the element "da" and the one cell will be named da-1. This cell will be our ball. It is drawn in the center of the grid using the ELLIPSE TOOL and filled with the PAINT TOOL. Once the ball is filled with color, you will want to select its outline and delete it so that all that is left is the inner paint filled zone in the shape of a ball. To get a perfectly round circle for your ball you can hold the "shift" key while drawing your circle. I actually just do mine visually because I prefer my ball not being exactly perfectly round.
(fig. 2: Cell dc-1)
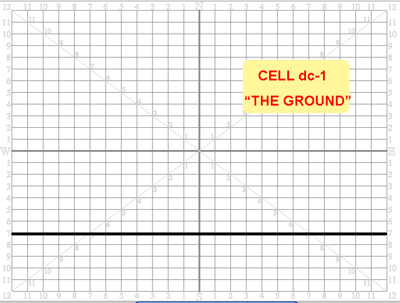
We can't animate a bouncing ball without a surface on which it will bounce, so next we need to create a second drawing element which will also have just a single cell drawing for the ground. It's basically just a thick black line, cell dc-1.
(fig. 3: Cell db-1)
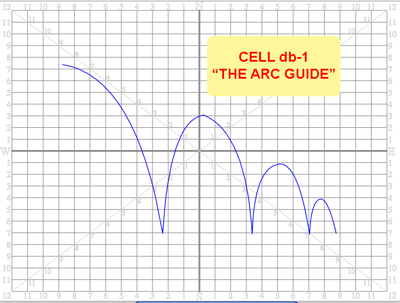
Now we are going to create another drawing element which also will have one cell drawing. This third drawing element, named "db", is going to act as a visual guide for our bouncing ball. Don't confuse this with a motion path or a motion guide. It is just a drawing of the path we want to use to describe the falling and bouncing of our ball. It is a visual animator's reference only and won't be included in the final animation movie.
With our three drawing elements created and our three cell drawings made, we are ready to switch from "drawing view" to "camera view" and start keyframing our bouncing ball action. The first thing you have to do is to decide on the amount of time you want to use to show this action. I set my example up using 32 frames for the bouncing action and I had to decide on which frames I would have the ball contact the ground and on which frames I would have the ball reach the top of its rebound. I created a simple timing diagram as a guide for my animating. Frames 1,12,21,and 28 are my top of the bounce rebound frames and frames 7,17,25, and 32 will be my ground contacts. One of the fun aspects of animating is that you can try your own ideas for timing your own action, so my choices are just that, my personal choices.
So now that you have your three drawing elements each containing a single cell at frame one, you will need to use the EXTEND EXPOSURE command to extend that one cell's exposure for each track out for 32 frames.
You will really only need to use one keyframing tool in this process. It will be the TRANSFORM tool, keyboard shortcut key (7). This is often referred to as the "universal" keyframing tool because it is used to set keys for location, rotation, scaling, and deformations. Any time you select an object with the TRANSFORM tool active you will see a selection bounding box with "hollow" un-filled grab handles. Any time you move, rotate, scale, or deform the selected object, using this TRANSFORM tool, TBS will automatically set or update the appropriate key framed values for the current frame. So for example if the current frame for the selected object is a "tweened" frame, it will be converted into a keyframe.
NOTE: Be careful not to use the SELECT tool (6) which has a bounding box that looks similar but has solid filled grab handles. The SELECT tool is not used for setting any keyframes, it is only used to set static scene level parameters. ( refer to Key Framed Animation for more details.)
AUTHOR'S NOTE: I have included five embedded interactive slide shows in this tutorial. You can follow the animation process by viewing them and navigating through their slides using the Next and Previous arrows in the upper left corner of the graphics.
(fig. 4: Step by step slide show #1 )

(fig. 5)
Above is the timeline as it looks after you have set those eight initial key frames. Notice that there are connecting lines displayed between the keyframe markers. These connecting lines indicate that the segments between the keyframes are non-constant segments which is the same as saying that TBS will generate the inbetween frames which is referred to as "tweening". TBS can be set up to always create non-constant segments when you set keyframes or it can be set to always create constant segments and you will then manually have to designate when you want a connecting segment to be non-constant. I discussed this in the previous series on Key Framed Animation.
Above is the bouncing ball animation created with just the eight tweened keyframes. It leaves at lot to be desired, as you can see. The ball isn't following the arc guide but rather it is moving in a straight line from key position to key position. And it is moving at a constant velocity which means that the spacing between frames is exactly the same for all frames. (more on spacing later)
Your next steps in doing the bouncing ball are first pass refinements. You are going to select certain inbetween frames which are currently "tweened" and replace them with keyframes that better describe the path you want the ball to follow. One helpful hint at this point is to edit the color you used to make the ball and lower its opacity to about 33% which will make it appear transparent and make it easier to see through it to position it along your visual guide arc. When you finish all of your animating you can set the opacity back to 100% before publishing the final movie.
(fig. 6: Step by step slide show #2 )

(fig. 7)
Above is how your timeline will appear when you have finished your first pass refinement and added 7 more inbetween keyframes.
Next you are going to do a second pass refinement where you will convert the remaining 17 inbetween frames into keyframes. This will result in the ball bounce following your chosen guide arc exactly. It still has a constant velocity but we will address that soon.
(fig.8: Step by step slide show #3 )

(fig. 9)
Above is how your timeline will look when you finish converting all the "tweened" inbetween frames into keyframes.
Above is the bouncing ball animation as created from our 2 revised keyframed passes. It is now following the guide arc nicely and we are now ready to refine the velocity of this action. To do that we will adjust the spacing between frames. The timing of the action is determined by the number of frames. But the changes in the speed of movement are adjusted by increasing or decreasing the amount of change between frames. We refer to this amount of change between frames as the spacing. The closer the spacing, the slower the speed of the movement appears. While the farther apart the spacing, the faster the movement appears. Forces in the physical world cause objects to accelerate and decelerate as opposed to just moving along at a constant velocity. Also in the case of a bouncing ball, the energy stored in the ball deceases after each ground contact which is visually seen by the decaying arcs between ground contacts.
(fig. 10: Step by step slide show #4)
Above is the animation of the bouncing ball after we have adjusted the spacing between the frames. It now bounces with a non constant velocity. It speeds up and it slows down as it moves down and back up etc.
We are almost done, but we still can improve on the bouncing ball by adding in squash and stretch. Squash and stretch are the natural deformations that the ball experiences due to external forces and things like gravity and the ground. The ball will compress or squash as it contacts the ground and it will elongate or stretch as it accelerates into a contact or out of a contact. One important trick associated with squash and stretch is that the volume of the object should be held constant even when deformed. The object does not shrink or expand it just deforms. (Really exaggerated animation does not always follow this guideline but that's just to produce a humorous cartoony effect.)
(fig. 11: Step by step slide show #5 )

(fig. 12)
Above is how your timeline will look when you finish animating the bouncing ball animation. Notice that you will un-check the tracks for the guide arc and the spacing marks so that they are not included in the final movie. Also at this time you will want to return the opacity of the color of your ball to 100%.
Above is the final movie of the bouncing ball action. I added some extra frames at the end to allow for a slight roll to a stop from the last contact. You can play with the timing and the spacing of your own version of this bouncing ball and you can learn a lot from seeing the results of those experiments.
Hopefully you are beginning to understand how to use keyframing and tweening. First off, you should appreciate that you must decide the basic timing and spacing of any action. The software can help you to test out your ideas, but it can not really replace your skill or experience as the animator. If you set a few keys and "tween" the rest you will just get "tweeny" looking results. The best technique is to start with the basic tweened results and then step wise refine the action replacing the tweens with adjusted keyframes until you get a proper look to your work. Comments are always appreciated and I'll do my best to answer any of your questions here or on the TBS User Forums.
If you are unfamiliar with the basics of key framed animation in Toon Boom Studio, before you continue here, I highly recommend that you take the time to read the 5 part series I previously wrote starting with Key Framed Animation Part 1 .
The tutorial will unfold as follow:
1. Creation of assets (cells) for a ball, a ground line, and a reference guide.
2. Switch to "camera view" and begin setting primary keys for the action.
3. Pass 1 refinements of inbetween frames converting some tweens to keys.
4. Pass 2 refinements of inbetween frames converting remaining tweens to keys.
5. Revising the spacing of the keys to improve the action.
6. Adding in squash and stretch to improve the action.
7. The final results.

(fig. 1: Cell da-1)
We are going to start our bouncing ball animation by first creating a drawing element and creating one cell drawing in that element. We will name the element "da" and the one cell will be named da-1. This cell will be our ball. It is drawn in the center of the grid using the ELLIPSE TOOL and filled with the PAINT TOOL. Once the ball is filled with color, you will want to select its outline and delete it so that all that is left is the inner paint filled zone in the shape of a ball. To get a perfectly round circle for your ball you can hold the "shift" key while drawing your circle. I actually just do mine visually because I prefer my ball not being exactly perfectly round.

(fig. 2: Cell dc-1)
We can't animate a bouncing ball without a surface on which it will bounce, so next we need to create a second drawing element which will also have just a single cell drawing for the ground. It's basically just a thick black line, cell dc-1.

(fig. 3: Cell db-1)
Now we are going to create another drawing element which also will have one cell drawing. This third drawing element, named "db", is going to act as a visual guide for our bouncing ball. Don't confuse this with a motion path or a motion guide. It is just a drawing of the path we want to use to describe the falling and bouncing of our ball. It is a visual animator's reference only and won't be included in the final animation movie.
With our three drawing elements created and our three cell drawings made, we are ready to switch from "drawing view" to "camera view" and start keyframing our bouncing ball action. The first thing you have to do is to decide on the amount of time you want to use to show this action. I set my example up using 32 frames for the bouncing action and I had to decide on which frames I would have the ball contact the ground and on which frames I would have the ball reach the top of its rebound. I created a simple timing diagram as a guide for my animating. Frames 1,12,21,and 28 are my top of the bounce rebound frames and frames 7,17,25, and 32 will be my ground contacts. One of the fun aspects of animating is that you can try your own ideas for timing your own action, so my choices are just that, my personal choices.
So now that you have your three drawing elements each containing a single cell at frame one, you will need to use the EXTEND EXPOSURE command to extend that one cell's exposure for each track out for 32 frames.
You will really only need to use one keyframing tool in this process. It will be the TRANSFORM tool, keyboard shortcut key (7). This is often referred to as the "universal" keyframing tool because it is used to set keys for location, rotation, scaling, and deformations. Any time you select an object with the TRANSFORM tool active you will see a selection bounding box with "hollow" un-filled grab handles. Any time you move, rotate, scale, or deform the selected object, using this TRANSFORM tool, TBS will automatically set or update the appropriate key framed values for the current frame. So for example if the current frame for the selected object is a "tweened" frame, it will be converted into a keyframe.
NOTE: Be careful not to use the SELECT tool (6) which has a bounding box that looks similar but has solid filled grab handles. The SELECT tool is not used for setting any keyframes, it is only used to set static scene level parameters. ( refer to Key Framed Animation for more details.)
AUTHOR'S NOTE: I have included five embedded interactive slide shows in this tutorial. You can follow the animation process by viewing them and navigating through their slides using the Next and Previous arrows in the upper left corner of the graphics.
(fig. 4: Step by step slide show #1 )

(fig. 5)
Above is the timeline as it looks after you have set those eight initial key frames. Notice that there are connecting lines displayed between the keyframe markers. These connecting lines indicate that the segments between the keyframes are non-constant segments which is the same as saying that TBS will generate the inbetween frames which is referred to as "tweening". TBS can be set up to always create non-constant segments when you set keyframes or it can be set to always create constant segments and you will then manually have to designate when you want a connecting segment to be non-constant. I discussed this in the previous series on Key Framed Animation.
Above is the bouncing ball animation created with just the eight tweened keyframes. It leaves at lot to be desired, as you can see. The ball isn't following the arc guide but rather it is moving in a straight line from key position to key position. And it is moving at a constant velocity which means that the spacing between frames is exactly the same for all frames. (more on spacing later)
Your next steps in doing the bouncing ball are first pass refinements. You are going to select certain inbetween frames which are currently "tweened" and replace them with keyframes that better describe the path you want the ball to follow. One helpful hint at this point is to edit the color you used to make the ball and lower its opacity to about 33% which will make it appear transparent and make it easier to see through it to position it along your visual guide arc. When you finish all of your animating you can set the opacity back to 100% before publishing the final movie.
(fig. 6: Step by step slide show #2 )

(fig. 7)
Above is how your timeline will appear when you have finished your first pass refinement and added 7 more inbetween keyframes.
Next you are going to do a second pass refinement where you will convert the remaining 17 inbetween frames into keyframes. This will result in the ball bounce following your chosen guide arc exactly. It still has a constant velocity but we will address that soon.
(fig.8: Step by step slide show #3 )

(fig. 9)
Above is how your timeline will look when you finish converting all the "tweened" inbetween frames into keyframes.
Above is the bouncing ball animation as created from our 2 revised keyframed passes. It is now following the guide arc nicely and we are now ready to refine the velocity of this action. To do that we will adjust the spacing between frames. The timing of the action is determined by the number of frames. But the changes in the speed of movement are adjusted by increasing or decreasing the amount of change between frames. We refer to this amount of change between frames as the spacing. The closer the spacing, the slower the speed of the movement appears. While the farther apart the spacing, the faster the movement appears. Forces in the physical world cause objects to accelerate and decelerate as opposed to just moving along at a constant velocity. Also in the case of a bouncing ball, the energy stored in the ball deceases after each ground contact which is visually seen by the decaying arcs between ground contacts.
(fig. 10: Step by step slide show #4)
Above is the animation of the bouncing ball after we have adjusted the spacing between the frames. It now bounces with a non constant velocity. It speeds up and it slows down as it moves down and back up etc.
We are almost done, but we still can improve on the bouncing ball by adding in squash and stretch. Squash and stretch are the natural deformations that the ball experiences due to external forces and things like gravity and the ground. The ball will compress or squash as it contacts the ground and it will elongate or stretch as it accelerates into a contact or out of a contact. One important trick associated with squash and stretch is that the volume of the object should be held constant even when deformed. The object does not shrink or expand it just deforms. (Really exaggerated animation does not always follow this guideline but that's just to produce a humorous cartoony effect.)
(fig. 11: Step by step slide show #5 )

(fig. 12)
Above is how your timeline will look when you finish animating the bouncing ball animation. Notice that you will un-check the tracks for the guide arc and the spacing marks so that they are not included in the final movie. Also at this time you will want to return the opacity of the color of your ball to 100%.
Above is the final movie of the bouncing ball action. I added some extra frames at the end to allow for a slight roll to a stop from the last contact. You can play with the timing and the spacing of your own version of this bouncing ball and you can learn a lot from seeing the results of those experiments.
Hopefully you are beginning to understand how to use keyframing and tweening. First off, you should appreciate that you must decide the basic timing and spacing of any action. The software can help you to test out your ideas, but it can not really replace your skill or experience as the animator. If you set a few keys and "tween" the rest you will just get "tweeny" looking results. The best technique is to start with the basic tweened results and then step wise refine the action replacing the tweens with adjusted keyframes until you get a proper look to your work. Comments are always appreciated and I'll do my best to answer any of your questions here or on the TBS User Forums.
Labels: Key Framed Animation, Tutorial


17 Comments:
This tutorial was absolutely fantastic. Thanks for the time and effort you put into it.
I'm glad that you found it useful. You are the only one to comment so far. I was beginning to wonder if people didn't like the format of presenting much of the material in slide show form. Thanks for the feedback.
VERY VERY helpful..Thank You!!!
You are most welcomed, I'm glad you found it useful.
Great tutorial! Thank you so much... I finally understand keyframing now :)
Thanks for the feedback, I'm always glad to hear that the tutorials I write are being understood successfully and helping readers to learn.
Hi JK.
Just wanted to know how to get the cross hatch lines for the spacing when adjusting the velocity. Do I just draw them in or is there a function for it? I may have missed something but I can't seem to figure it out.
Thankyou, your tutorials are awesome and explain every detail needed, I'm learning heaps just from your blog, keep it up!
Alex
Alex,
The spacing notations on a timing diagram are manually created by the animator based on their observation of the action they are trying to represent or based on their intuitive sense of how to best accentuate parts of an action.
Learning to develop timing diagrams is an important skill for any animator. I have written a useful series of articles on the fundamentals of animation timing so check it out. Understanding Timing in AnimationYou can also control spacing using the Velocity function in the Function Editor in TBS. This is a tool used primarily for motion path "tweening" adjustments. But in general you will do most spacing visually and therefore it is normally based on your own manually drawn timing diagrams. They are just a shorthand form of notation that is part of planning any animation.
I'm not sure where you have described how to adjust the spacing. For example, I made an animation but it goes too fast and I think that I want to add more frames between the keyframes to make it go slower. How do I do that?
To add frames to your animation you use the extend exposure command. There is a good explanation of how to adjust timing in
Toon Boom Fundamentals - Basics Part 1 so check that out.
Thanks, I just got ToonBoom and I will use this for sure!!
these tuts rock, and are helping me get my printed strip animated...thx so much! I want to make the ball a fused and ready to explode canon ball...any tips? thx!!!
Awesome Tutorial man....do you have any other tips n tricks? I'm taking 2D animation at school and am slowly falling in love with it.
Glad you enjoyed the tutorial. The best advise I can give to you is to observe and experiment and practice and be patient and persistent.
I had been losing sleep watching Toon Boom tutorials, and so far Yours is the most detailed and concise. You are not just a great animator but an excellent teacher and a superb writer. Two words... Thank You!!
I just purchased Toon Boom last night and I just want to say how fantastic your tutorials are. I have created 4 short animations so far in just a few hours! Thank you so very much!!!!!
Been looking for hours if not more trying to find a tutorial (that's clear & not dodgy like those on youtube!) about how to get a ball to move from one side of the ani to the other! Finally found how. Only thing I have to find now is how to get the character to jerk as he gets hit... Great tute.
Post a Comment
<< Home