Animating a Cut-Out Character in ToonBoom
This is the third part of our new tutorial series on creating and animating cut-out characters in ToonBoom Studio. If you haven't read Building a Cut-Out Character in ToonBoom or Rigging a Cut-Out Character in Toon Boom previously, I suggest that you do that before proceeding here.
Perhaps the most difficult aspect of this type of tutorial is the extensive complexity of the steps involved in performing key framed animation. I'm going to try my best to show you the most significant steps and to provide you with some helpful guides to assist your work. It isn't that difficult, but key framed animation is tedious and requires that you take your time and be very aware of what you are doing and how your are working. And just because you are not making individual drawings, key framed animation is still animating, so not only does it involve knowledge of using the software it also requires animating skills just the same as if you were hand drawing the animation. So you still have to deal with poses and timing etc. It takes practice, so let's get started.
I'm providing HERE a download of a SWF file that you can import into TBS to use as a pose guide for this animation. It will help you in positioning and posing the bird and in laying out the first thirty frames of the bird walking. So this first slide presentation will show you how to import the SWF into your project. If you download the ZIP file be sure to unzip it and remember where you put the walk0.swf file so that you can navigate to it in the file dialog when asked.
You can do that SWF import now or later when you are actually doing your animation. It is strictly provided as a aid to setting up the poses for the bird character. If you want to do your poses without using the guide that's a personal choice. I didn't have it when I did the animation myself, but then again I have done plenty of character walks in my career, so I just used my past experience to create the poses. In any case we will begin animating in the next slide presentation. My approach is to animate in multiple passes. So the first pass will be to get the basic walking animated and then in future passes we will refine the walk by adding movements of other body parts. Also I'm using what is termed as a straight ahead approach. Instead of doing certain key poses first and then doing inbetween poses, I'm doing each pose in sequence. You can key frame animate using either approach. I felt it would be easier to follow by showing the animating straight ahead style.
The first pass roughed in walk
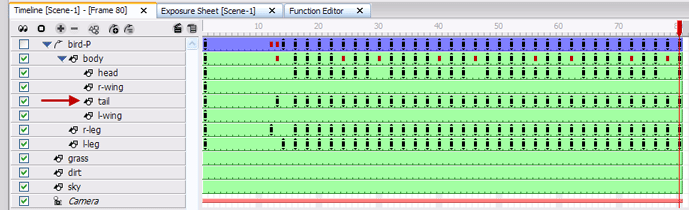
Fig. 1 The timeline for our second pass of the walk where we animate the tail
After we have completed animating our rough walk in the first pass we are ready to go back through the timeline and make a second pass. This time we will just focus on animating the bird's tail feathers to add to our existing poses. We will leave "bird-P" expanded and we will just select the tail track label. Then we can step through the frames using the [S] key to move ahead to the next frame and the [A] key to move back to the previous frame. All animating is done using the scene transform tool (7). Remember in a walking motion the bird's rear end (tail feathers) will probably move up and down opposite the main weight shifting of the bird, sort of a counterbalancing motion.
The second pass walk with the tail movement added

Fig. 2 The timeline for our third pass of the walk where we animate the wings
After we have completed animating the tail movement in the second pass we are ready to go back through the timeline and make a third pass. This time we will just focus on animating the bird's right and left wings to add to our existing poses. We will leave "bird-P" expanded and we will just select the appropriate wing's track label. Then we can step through the frames using the [S] key to move ahead to the next frame and the [A] key to move back to the previous frame. All animating is done using the scene transform tool (7). The idea behind doing multiple passes is that it allows us to focus on small details. We are really trying to add some personality to the rough walk. Remember in a walking motion arms (wings) move counter directional to legs.
The third pass of the walk with the wing movements added
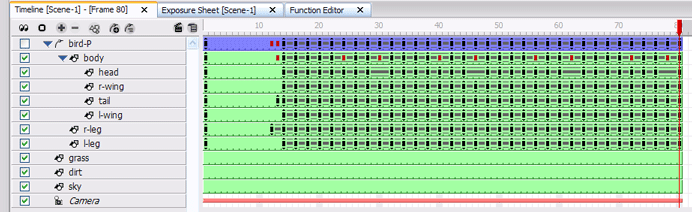
Fig. 3 The timeline with non-constant segments added between the keyframes.
After we have completed animating our third pass we are ready to go back through the timeline and set non-constant segments between each keyframe on each element. This is just like having an assistant animator make inbetween drawings between each of our pose drawings. This "tweening" step adds a degree of smoothing to the walking movement. Many animators will stop after this step but it all depends on what you are trying to accomplish. All setting of non-constant segments is done with the scene transform tool (7) actively selected on the tool palette which insures that tweening is applied to all types of keyframe parameters. (location, scale, rotation, skew) The easiest way to make these tweening settings is to collapse the "bird-P" peg and set the segments between the keys on that main character peg letting the settings just reflect down to all the "hidden" children elements.
The fully tweened version of the bird walking
That completes this installment in our series on building, rigging and animating a cut-out character in ToonBoom. In the next part of this series we will see how to remove the "tweening" and adjust and tweak the walk to make it even better.
Perhaps the most difficult aspect of this type of tutorial is the extensive complexity of the steps involved in performing key framed animation. I'm going to try my best to show you the most significant steps and to provide you with some helpful guides to assist your work. It isn't that difficult, but key framed animation is tedious and requires that you take your time and be very aware of what you are doing and how your are working. And just because you are not making individual drawings, key framed animation is still animating, so not only does it involve knowledge of using the software it also requires animating skills just the same as if you were hand drawing the animation. So you still have to deal with poses and timing etc. It takes practice, so let's get started.
I'm providing HERE a download of a SWF file that you can import into TBS to use as a pose guide for this animation. It will help you in positioning and posing the bird and in laying out the first thirty frames of the bird walking. So this first slide presentation will show you how to import the SWF into your project. If you download the ZIP file be sure to unzip it and remember where you put the walk0.swf file so that you can navigate to it in the file dialog when asked.
You can do that SWF import now or later when you are actually doing your animation. It is strictly provided as a aid to setting up the poses for the bird character. If you want to do your poses without using the guide that's a personal choice. I didn't have it when I did the animation myself, but then again I have done plenty of character walks in my career, so I just used my past experience to create the poses. In any case we will begin animating in the next slide presentation. My approach is to animate in multiple passes. So the first pass will be to get the basic walking animated and then in future passes we will refine the walk by adding movements of other body parts. Also I'm using what is termed as a straight ahead approach. Instead of doing certain key poses first and then doing inbetween poses, I'm doing each pose in sequence. You can key frame animate using either approach. I felt it would be easier to follow by showing the animating straight ahead style.
The first pass roughed in walk
Fig. 1 The timeline for our second pass of the walk where we animate the tail
After we have completed animating our rough walk in the first pass we are ready to go back through the timeline and make a second pass. This time we will just focus on animating the bird's tail feathers to add to our existing poses. We will leave "bird-P" expanded and we will just select the tail track label. Then we can step through the frames using the [S] key to move ahead to the next frame and the [A] key to move back to the previous frame. All animating is done using the scene transform tool (7). Remember in a walking motion the bird's rear end (tail feathers) will probably move up and down opposite the main weight shifting of the bird, sort of a counterbalancing motion.
The second pass walk with the tail movement added
Fig. 2 The timeline for our third pass of the walk where we animate the wings
After we have completed animating the tail movement in the second pass we are ready to go back through the timeline and make a third pass. This time we will just focus on animating the bird's right and left wings to add to our existing poses. We will leave "bird-P" expanded and we will just select the appropriate wing's track label. Then we can step through the frames using the [S] key to move ahead to the next frame and the [A] key to move back to the previous frame. All animating is done using the scene transform tool (7). The idea behind doing multiple passes is that it allows us to focus on small details. We are really trying to add some personality to the rough walk. Remember in a walking motion arms (wings) move counter directional to legs.
The third pass of the walk with the wing movements added
Fig. 3 The timeline with non-constant segments added between the keyframes.
After we have completed animating our third pass we are ready to go back through the timeline and set non-constant segments between each keyframe on each element. This is just like having an assistant animator make inbetween drawings between each of our pose drawings. This "tweening" step adds a degree of smoothing to the walking movement. Many animators will stop after this step but it all depends on what you are trying to accomplish. All setting of non-constant segments is done with the scene transform tool (7) actively selected on the tool palette which insures that tweening is applied to all types of keyframe parameters. (location, scale, rotation, skew) The easiest way to make these tweening settings is to collapse the "bird-P" peg and set the segments between the keys on that main character peg letting the settings just reflect down to all the "hidden" children elements.
The fully tweened version of the bird walking
That completes this installment in our series on building, rigging and animating a cut-out character in ToonBoom. In the next part of this series we will see how to remove the "tweening" and adjust and tweak the walk to make it even better.
Labels: Cut-Out Animation, Key Framed Animation, Tutorial


11 Comments:
i stumbled on your blog. im trying to teach kids how to draw simple characters and eventually create a comic book. problem is, i dont know how to export their pictures and then drop then into the comic template ive designed so that they can have a finished product. suggestions for other blogs i can refer to? when i export to the current files, it only give me one picture, and its a pdf...i prefer not to have convert things one by one if i dont have to. thanks! nice work!
Check out comicboom It is a Toon Boom product that is designed to help kids make comic strips. Beyond that I'm not going to be able to help you very much. I use Photoshop for my own web comic and that's way too complicated for most kids.
I have founhd your blackbird tutorial to be more helpful than the Pink Panther (altho not as funny, you understand!). I've gotten to Part 3 where I download a zip file for the walk. But when I extract, I only have walk0.swf and am missing the other 4. Whereas I am new to cartooning, I'm not new to extracting and can't imagine what I'm doing wrong. Any suggestions? Oh, hope you have a good Memorial Day Holiday!
The only movie I provided was walk0. That's just to get you going on how to do the basic walk. You can do the rest on your own, just follow the tutorial.
I'm glad you are enjoying these. Thanks for the feedback about this one being more instructive. I tried to learn from feedback about the panther and make improvements in my instructional approach.
My big questions is once I have an walk cycle, what is the best way to get it to loop.
Right now I just copy and paste, as the "change loops" command doesn't affect peg children, and if I don't finish a the cycle its a mess.
Curious if there is a better way.
(also, I normally separate the directional movement on another peg)
Not really, the copy and paste approach seems to be the easiest way to extend cycles. As to the switching of directions you can do that either way using the same peg or a different peg, it is a matter of preference. If using the same peg you have to end one direction on a key at the end frame and then on some future frame start a new keyed sequence.
how do you do a counter? I did not see any explaination, and it's not in the library...thx!
Go to the top menu of this blog and select the Learning Track there is a section of articles listed labeled Useful Techniques and Tips and under that listing is an article call Perspectives and Counters. The requested info is in that article.
As always, great tutorial JK! I have a question, what is Peg-Only mode and what does it do? Also, I have been studying other animations frame by frame and it seems that some of them just make each arm--upperarm, forearm and hand--as one element. Same for the legs--upper leg, lower leg and foot. Then the have various poses of each element and, just like the mouth element which has several exposures that you can flip through, you do the same with the arms and legs. I've tried this for walk cycles and it works great and makes it much more reusable. You also avoid the nagging problem of joints not quite joining up seamlessly.
Good to hear from you Zeb,
Peg Only mode is almost a throw back theses days. It was a useful function in the days when pegs were not embedded in all elements. The idea was to prevent the user from selecting a non-peg element when setting keyframes. In the current versions of TBS this is not used very much unless the user is working with an old style rig.
As to the method you describe of reducing element complexity for easier animating I totally subscribe to that school of thought. Simpler is always a better solution.
Hey, JK, me again! I continue to come back to your tutorials and always find new things or tips that I overlooked the first time. When going through this again I see that I animate similar but in a slightly different manner. Once I complete one cycle I add the tweens and then copy and paste cycle after cycle. My main peg for the complete character only has two keyframes--starting position and ending position. --Many ways to get to Rome :-)
I only wish there was an easier way to add the tweens as you have to do them manually between each keyframe. Too bad TBS doesn't allow you to select several elements and poses and add tweens for all of them. Maybe some day!
Post a Comment
<< Home